Oh my gosh, do I love Halloween or what? It’s the one time of year I get to be a kid again, playing with food and making the spookiest, silliest treats imaginable. These easy Halloween snacks are my absolute go-to when I need something fun without the fuss – perfect for when my niece suddenly announces she’s bringing six friends over for a « monster mash » (yes, that actually happened last year!).
I remember the first time I made these eyeball treats – my kitchen looked like a mad scientist’s lab with peanut butter smeared everywhere and red icing « veins » trailing across the counter. But you know what? Those messy, giggly moments with my niece turned into our favorite Halloween tradition. Now it’s not Halloween until we’ve made at least three batches of these easy Halloween snacks. Whether you’re tackling last-minute party prep or just want a fun activity with kids, these no-bake treats will save your spooky soul.
Why You’ll Love These Easy Halloween Snacks
Trust me, these creepy little eyeballs are about to become your Halloween MVP for so many reasons:
- 15 minutes flat – I’ve literally whipped these up while answering the door for trick-or-treaters
- No oven required – Perfect for when you’re already baking twelve other things
- Kids go nuts for them – The grosser they look, the more the little monsters love ’em
- Customizable craziness – Add more veins, go cross-eyed, make zombies… the spooky possibilities are endless!
- Party perfect – They look fancy but take less effort than carving a pumpkin
Last year, my nephew’s friend gasped and said « These look SO disgusting! » – which, in kid language, is the highest compliment.
Ingredients for Easy Halloween Snacks
Okay, let’s gather our creepy-cute supplies! The beauty of these easy Halloween snacks is that you probably have most of this stuff in your pantry already. I like to set everything out on the counter like a mad scientist’s workstation – it makes the kids go wild with excitement. Here’s what you’ll need:
For the Eyeballs
- 1 cup peanut butter – creamy works best, but chunky gives extra texture if you want « bloodshot » eyes
- 1/2 cup powdered sugar – sift it if yours is lumpy like mine always seems to be
- 1 tbsp butter, softened – leave it out for about 15 minutes first
- 1/4 tsp vanilla extract – the secret ingredient that makes them taste like actual treats
For Decorating
- 1/4 cup semisweet chocolate chips – the mini ones work great for tiny eyeballs
- 1/4 cup red gel icing – get the kind in a squeeze tube for easy vein-drawing
Psst – for my nut-free friends, sunflower seed butter works just as well! The color’s a bit different but still totally spooky. I’ve even used cookie butter in a pinch when I was desperate – the orangey color made perfect zombie eyes!
How to Make Easy Halloween Snacks
Alright, let’s get our hands dirty – literally! Making these easy Halloween snacks is so simple, even my cat could probably do it (though I wouldn’t recommend letting him near the peanut butter). Here’s how we turn basic ingredients into creepy edible eyeballs that’ll have everyone screaming… for seconds!
- Mix it up: Dump the peanut butter, powdered sugar, softened butter, and vanilla into your mixing bowl. Now get in there with a sturdy spoon and mix until it’s smooth as a ghost’s sheet. You’ll know it’s ready when there are no dry patches left and the dough holds together when you pinch it.
- Roll those eyeballs: Pinch off about a tablespoon of dough and roll it between your palms to form a ball. Pro tip: if the mixture sticks to your hands, dampen them slightly with water. Aim for golf ball size – big enough to decorate easily but small enough to pop in your mouth whole when the sugar craving hits.
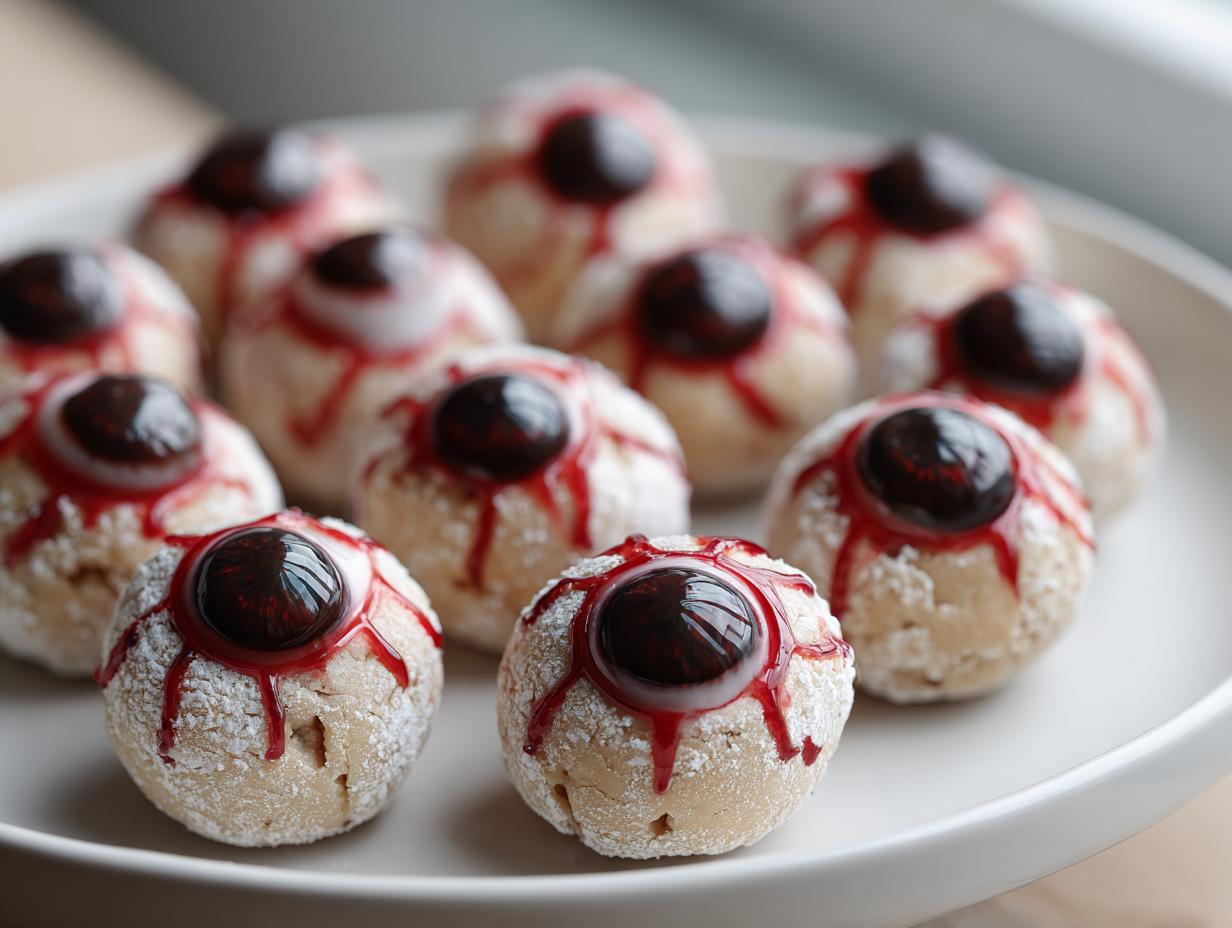
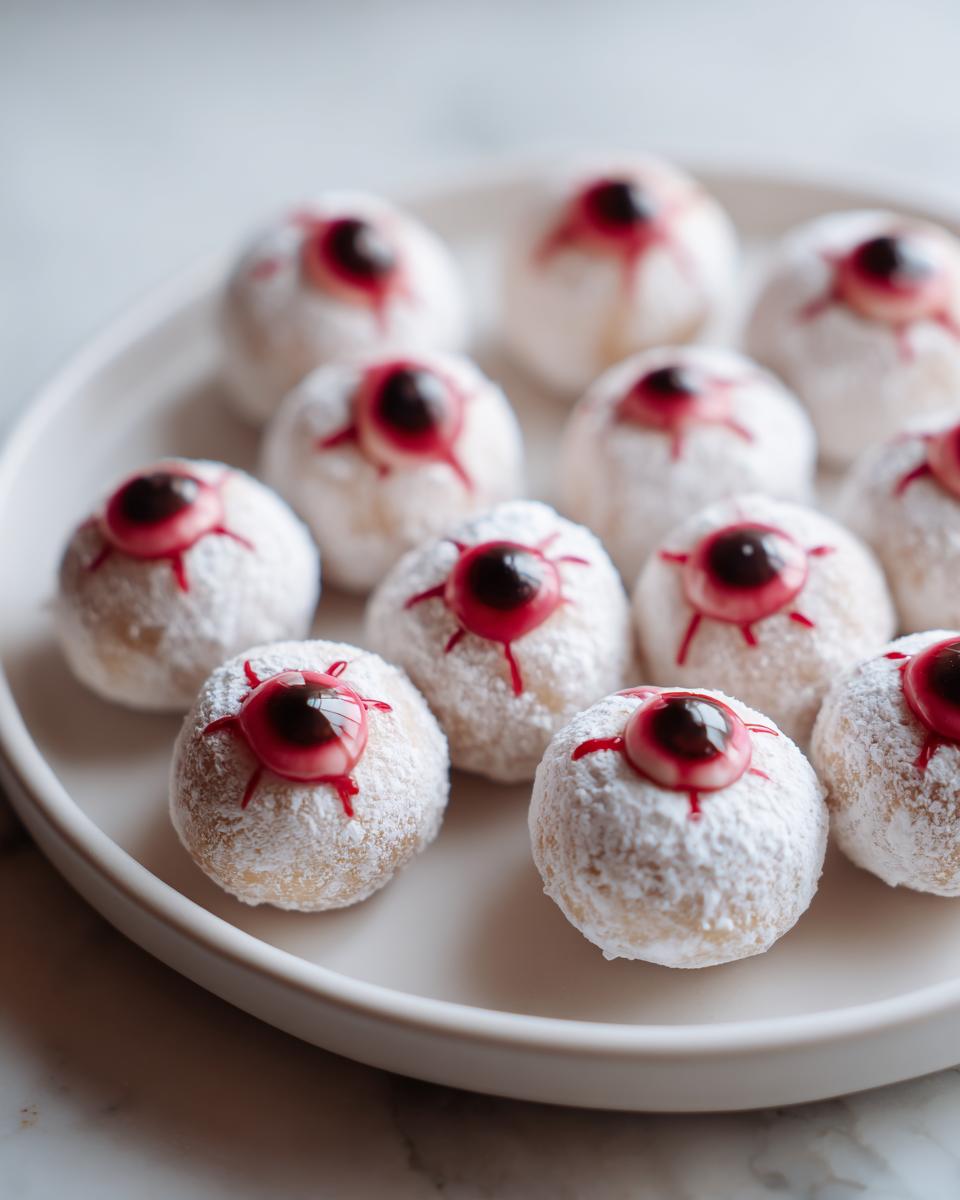
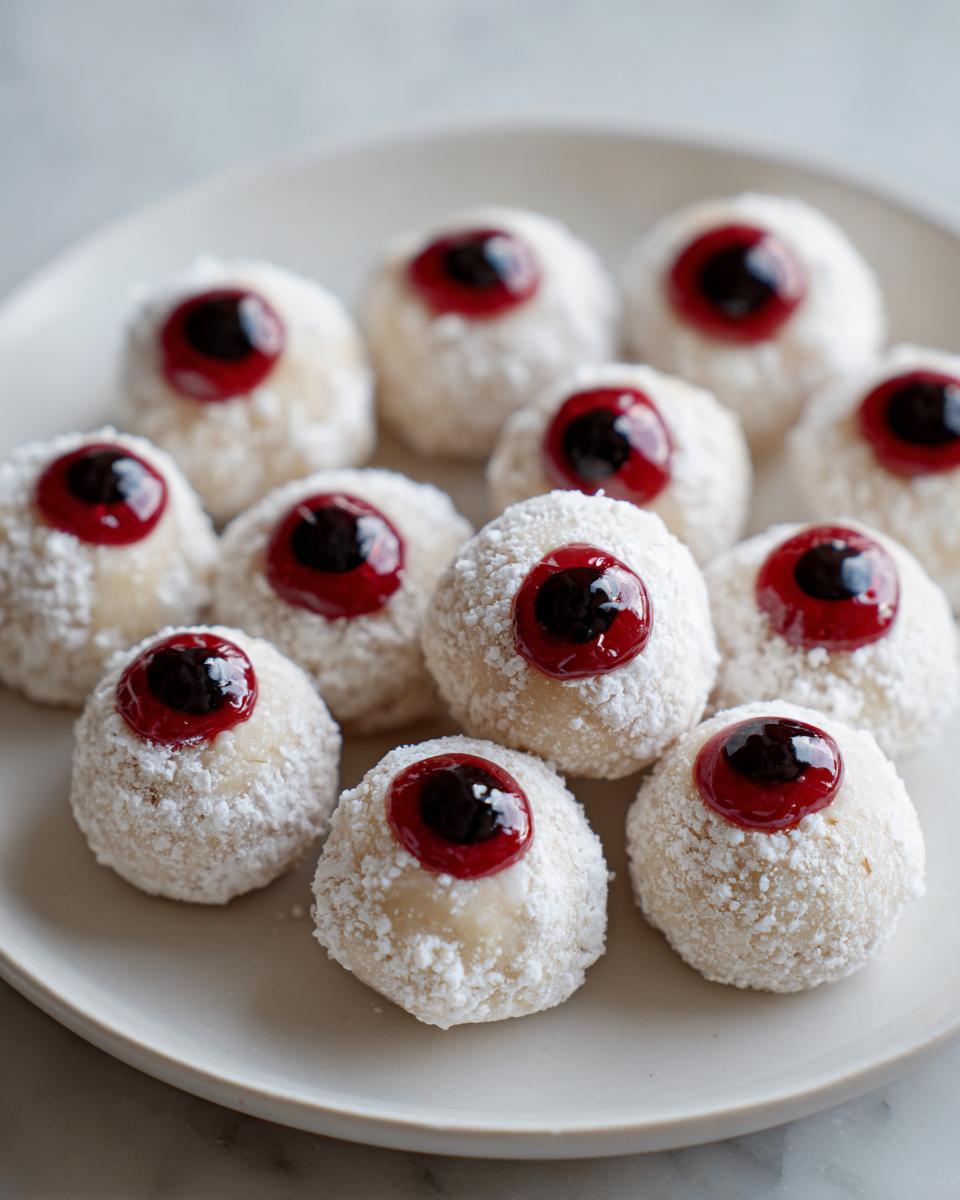
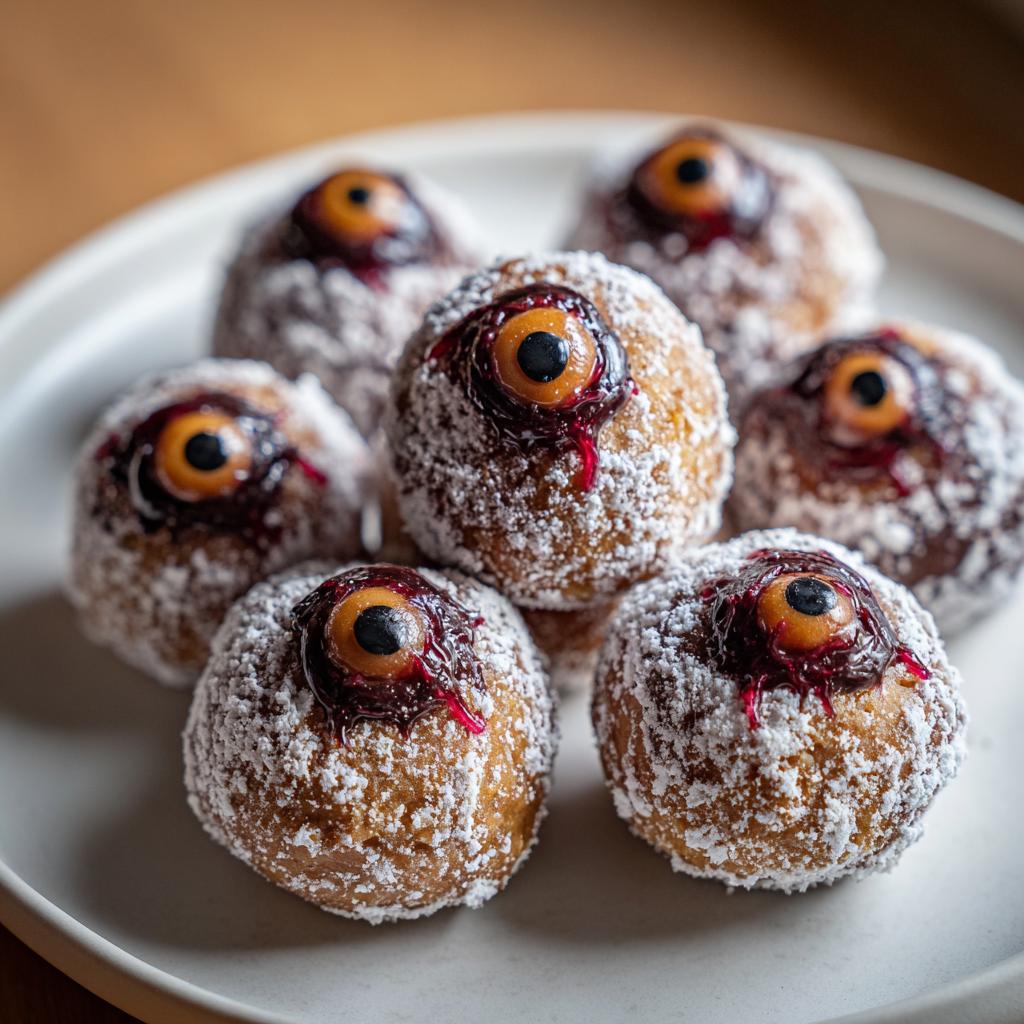
- Give them pupils: Now the fun part! Press one chocolate chip into the center of each ball. Don’t be shy – really nestle it in there so it stays put. I like to angle some sideways for that « I just saw something terrifying » look.
- Add the gross factor: Grab your red gel icing and get creative drawing squiggly veins radiating out from the chocolate chip. The messier they look, the better! My niece loves making some eyes bloodshot and others with just a few delicate veins – variety makes the platter extra spooky.
- Chill out: Pop your tray of eyeballs in the fridge for about 10 minutes to firm up. This is just enough time to clean up the icing disaster zone that used to be your kitchen counter.
See? Told you it was easy! The whole process takes less time than watching a Halloween cartoon special. Last year, my neighbor’s kids decorated an entire batch while I was still setting out the napkins – that’s how kid-friendly these easy Halloween snacks are!
Tips for Perfect Easy Halloween Snacks
After making approximately a million batches of these easy Halloween snacks (okay, maybe just dozens), I’ve picked up some tricks that’ll make your eyeballs the talk of the party:
- Sticky situation? If your peanut butter mixture feels too soft, pop it in the fridge for 10 minutes – it’ll be much easier to roll.
- Size matters: Use a melon baller or small cookie scoop for perfectly uniform eyeballs. Or don’t – wonky eyes are extra creepy!
- Storage secret: Keep them in an airtight container between layers of wax paper so they don’t stick together.
- My favorite hack: A sprinkle of edible glitter makes them look magically possessed – the kids go wild for it!
Oh! And if your icing veins start to bleed (they sometimes do), just dab gently with a paper towel. A little mess just adds to the Halloween charm!
Variations for Easy Halloween Snacks
Okay, let’s get creative with these easy Halloween snacks! The best part about this recipe is how easily you can switch things up to make totally different creepy creations. Here are my favorite twists that always get screams (the good kind):
Nut-free nightmare: Swap the peanut butter for sunflower seed butter – it works just as well and keeps all your little goblins safe. The slightly greenish tint actually makes them look extra monstrous!
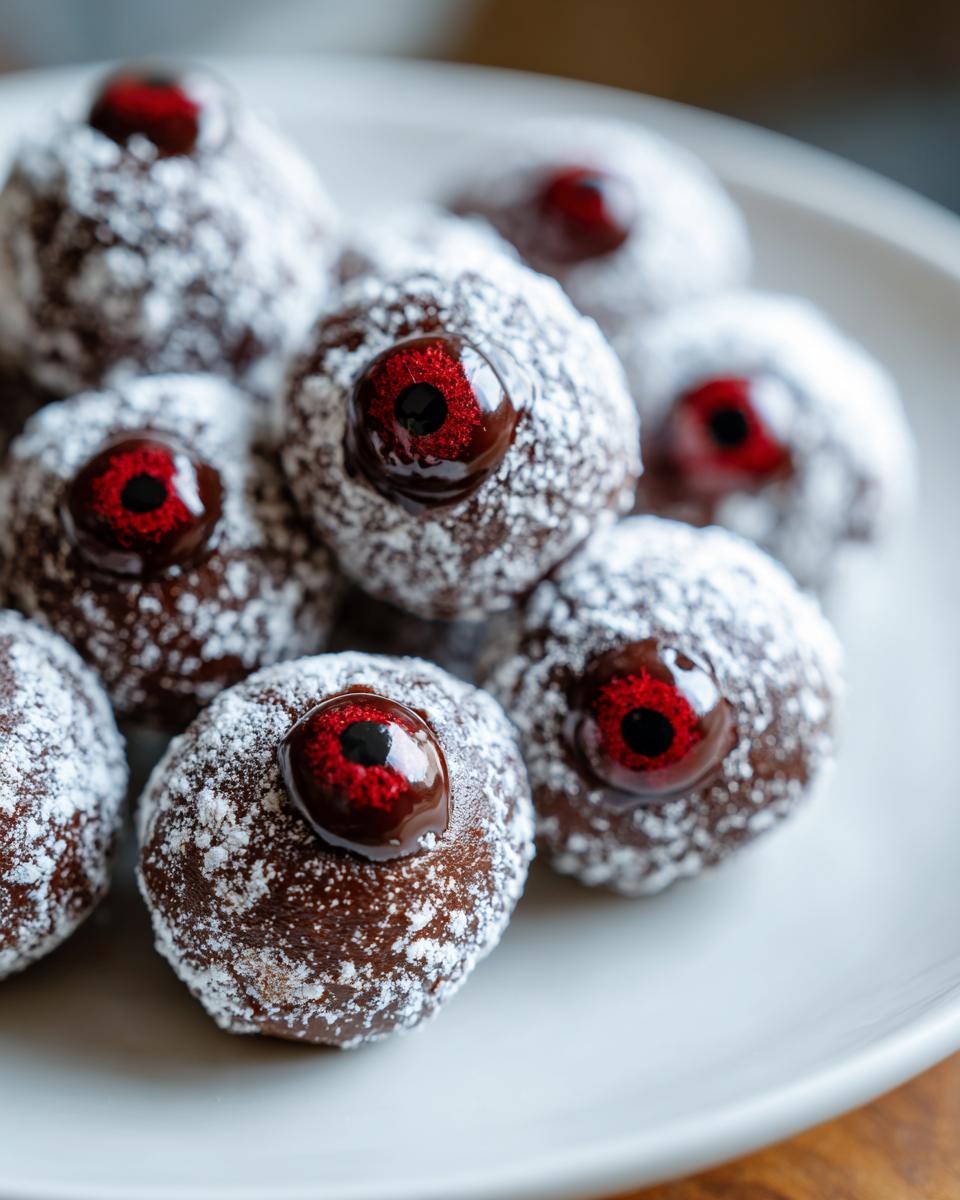
Zombie alert: Use white chocolate chips instead of regular ones for that classic undead look. Bonus points if you dab a tiny bit of black icing on them for dilated pupils – so creepy!
Monster mash: Try green gel icing instead of red to make alien or Frankenstein eyes. My nephew loves making a whole platter of different colored veins – it’s like a monster convention on a plate!
Honestly, once you start playing around, you’ll come up with your own spooky variations. That’s what makes these easy Halloween snacks so much fun – they’re like a blank (bloodshot) canvas for your creepy culinary creativity!
How to Store Easy Halloween Snacks
Okay, let’s talk storage for these easy Halloween snacks – because let’s be real, you’ll probably have leftovers (though in my house, they mysteriously disappear by morning). The good news is these creepy eyeballs keep beautifully! Just pop them in an airtight container with some wax paper between layers so they don’t stick together, then refrigerate. They’ll stay fresh for up to 3 days.
One little warning – the red gel icing might start to « bleed » a bit after a day or two. It doesn’t affect the taste at all, and honestly, the slightly smeared veins just make them look extra terrifying! If you want them picture-perfect for a party, I’d suggest decorating them the same day. But for casual munching? They’re delicious even when they’re a little messy – just like Halloween should be!
Nutritional Information
Just a quick heads up – these easy Halloween snacks are definitely treats, not tricks! Nutritional values are rough estimates and can change depending on your specific ingredients. They’re packed with peanut butter protein but also contain sugar – so enjoy them in between trick-or-treating rounds!
FAQs About Easy Halloween Snacks
I get asked about these easy Halloween snacks all the time – seems like everyone wants to know how to make them even easier! Here are the questions that pop up most often in my kitchen (usually while covered in red icing):
Can I make these eyeballs ahead of time?
Absolutely! In fact, they might be even better the next day. Just mix and shape the balls, then store them undecorated in the fridge overnight. Add the chocolate chips and icing veins right before serving so they stay picture-perfect spooky.
Will these freeze well for later?
Sadly no – the icing turns into a sticky mess when thawed. But honestly, they disappear so fast you won’t need to freeze them! If you must prep ahead, freeze just the undecorated balls, then thaw in the fridge before adding the finishing touches.
Can I swap in almond butter or other nut butters?
You bet! Almond butter works great, though it might make the dough a bit softer. Cashew butter gives a paler, ghostlier look that’s fun for Halloween. Just avoid the natural drippy kinds – you want something thick enough to hold its shape when rolled.
Help! My icing veins keep smearing!
Oh honey, I’ve been there! Try chilling the eyeballs for 15 minutes before adding veins – the cold surface helps the icing set faster. And use a light touch when drawing – no need to press hard. If all else fails, call them « zombie eyes » and pretend you meant them to look messy!
Are these safe for school parties with nut allergies?
Swap the peanut butter for sunflower seed butter and you’re golden! It tastes just as yummy and keeps all the little monsters safe. I always make a nut-free batch for my niece’s class – the teacher calls them our « friendly neighborhood eyeballs. »
Share Your Creations
I’d absolutely squeal with delight to see your creepy creations! Tag me on Instagram @SpookySnackQueen when you post photos of your easy Halloween snacks – bonus points if you’ve come up with even spookier variations. Nothing makes me happier than seeing all the wacky, wonderful ways you bring these edible eyeballs to life. Let’s make this Halloween the most deliciously terrifying one yet!
Easy Halloween Snacks
Ingrédients
Equipment
Method
- Mix peanut butter, powdered sugar, butter, and vanilla extract in a bowl until smooth.
- Roll the mixture into small balls and place them on a tray.
- Press a chocolate chip into each ball to create the pupil.
- Use red gel icing to draw veins around the eyeballs for a spooky effect.
- Chill for 10 minutes before serving.