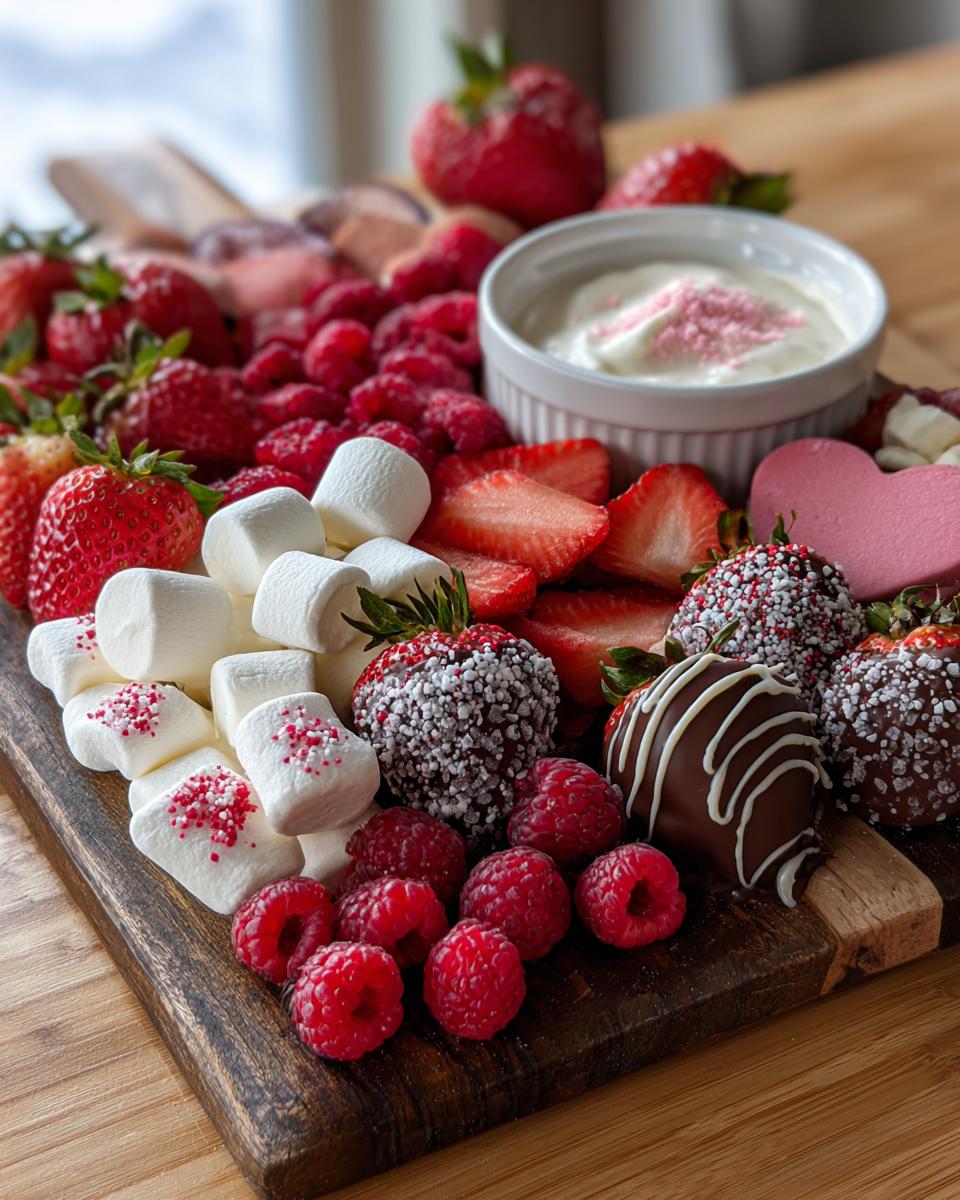
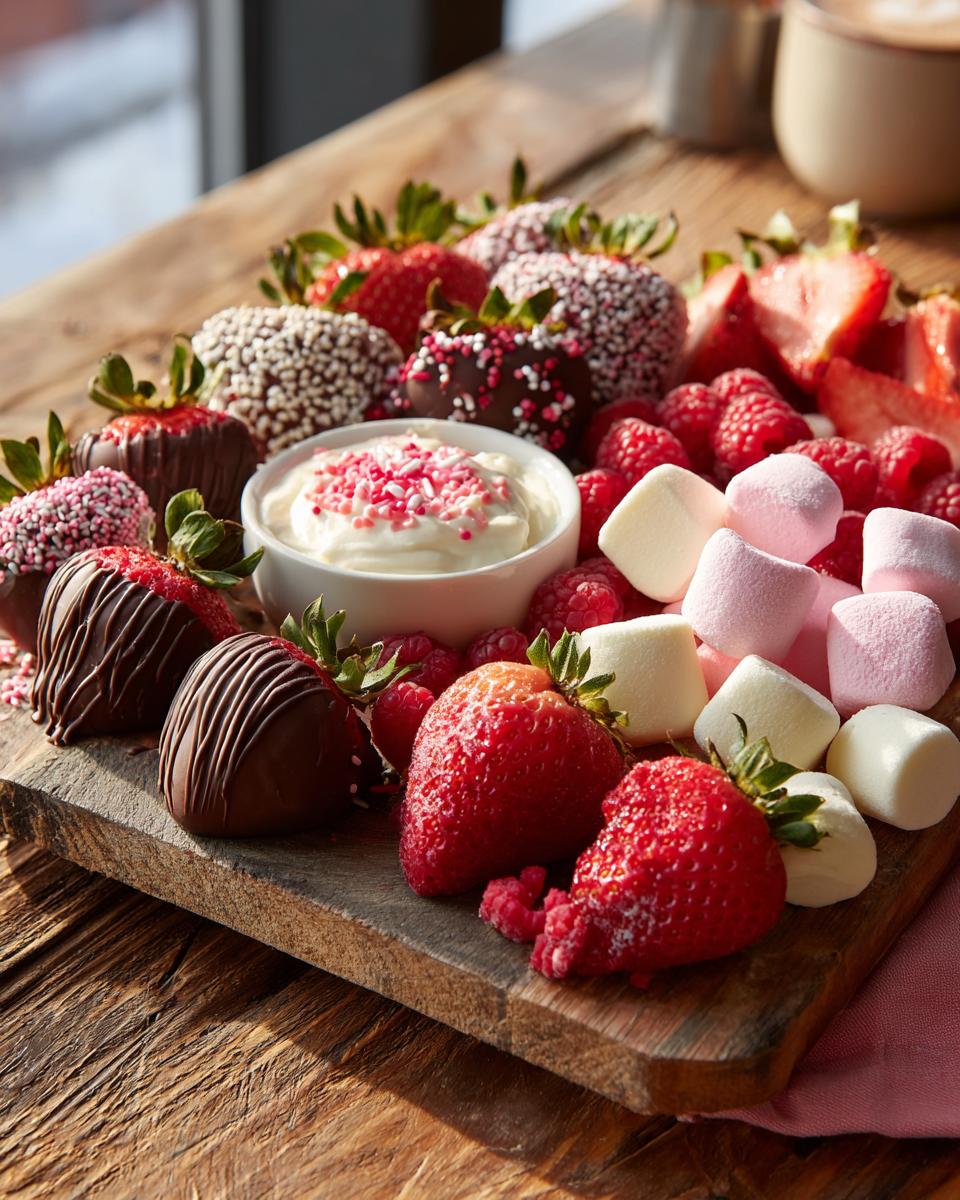
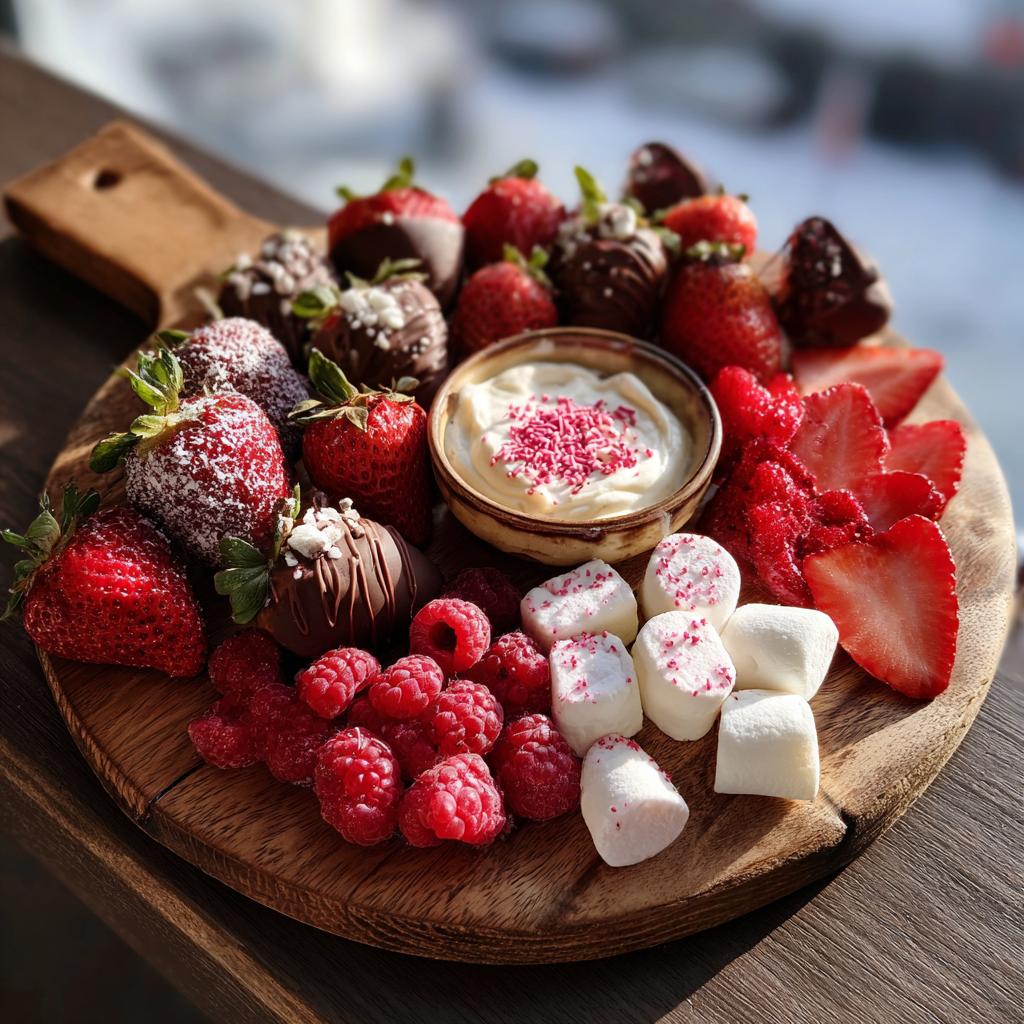
Valentine’s Day has always been my favorite excuse to go all out with desserts. There’s something magical about gathering around a table with loved ones, nibbling on sweet treats while sharing laughter and stories. My most cherished memory? Last year, when I surprised my partner with my first Valentine’s Day charcuterie dessert board. His face lit up at the sight of chocolate-dipped strawberries, heart-shaped candies, and juicy raspberries beautifully arranged on a wooden board. It wasn’t just delicious—it was an experience. Now, creating these sweet spreads has become our annual tradition. The best part? It takes just 20 minutes to create this edible love letter!
Why You’ll Love This Valentine’s Day Charcuterie Dessert Board
Let me tell you why this dessert board has become my go-to Valentine’s Day tradition. First off, it’s ridiculously easy to put together – we’re talking 20 minutes flat, even if you’re like me and get distracted by sneaking bites of chocolate while assembling (oops!). The best part? It’s completely customizable.
Here’s what makes it so special:
- No baking required – just arrange and you’re done
- Play with colors – those reds and pinks look stunning against a wooden board
- Perfect for sharing – my favorite kind of dessert
- Total crowd-pleaser – works for romantic dates or Galentine’s parties
Last year, I forgot to buy heart-shaped chocolates (oops again!) so I chopped up regular chocolate bars into rough heart shapes. Guess what? No one noticed, and it still got those « wow » reactions when I brought it to the table. That’s the beauty of this dessert board – it always looks impressive, no matter what!
Ingredients for Your Valentine’s Day Charcuterie Dessert Board
Okay, let’s talk ingredients – this is where the magic happens! I’ve broken everything down into three simple groups so you can shop and prep without any stress. Trust me, having everything measured and ready makes assembly a breeze (and gives you more time to sneak a few chocolate-covered strawberries… not that I’d know anything about that).
Chocolates & Sweets
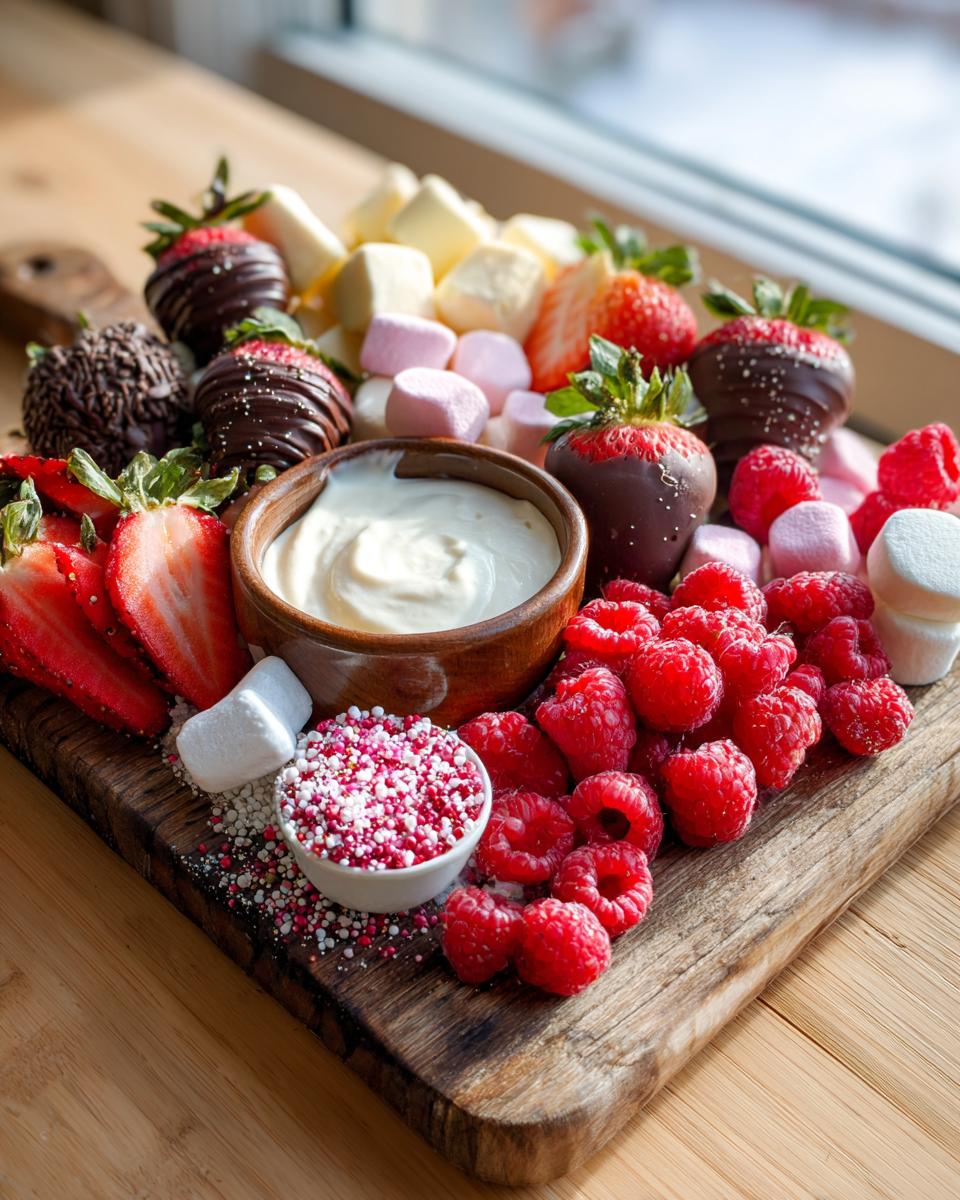
- 1 cup chocolate-covered strawberries (I always make extra because they disappear fast!)
- ½ cup heart-shaped chocolates (the more colorful, the better)
- ¼ cup mini marshmallows (these are my secret weapon for texture)
Fruits
- 1 cup raspberries (their vibrant red is perfect for Valentine’s Day)
- 1 cup strawberries, sliced (I like to cut them into heart shapes when I’m feeling fancy)
Extras
- ½ cup vanilla yogurt dip (this is what makes the fruit sing)
- ¼ cup red and pink sprinkles (because everything’s better with sprinkles)
Ingredient Notes and Substitutions
Here’s the thing – this board is all about flexibility! Don’t have heart-shaped chocolates? No problem! Chop up regular chocolate bars or use chocolate kisses instead. If you’re feeling extra, swap the vanilla yogurt for chocolate fondue – it’s decadent and perfect for dipping. Not a raspberry fan? Try blackberries or pomegranate seeds for that pop of red. And if you’re serving adults, a splash of champagne in the yogurt dip makes it extra special (just don’t tell the kids!). The key is to use what you love and what looks pretty together – that’s what makes it your own.
Equipment Needed for Your Valentine’s Day Charcuterie Dessert Board
Don’t stress about fancy equipment – you probably already have everything you need! The star of the show is a large serving board (mine’s a well-loved wooden one that’s seen many dessert adventures). If you don’t have a board, a large platter or even a baking sheet lined with parchment works just fine. You’ll also want a couple of small bowls for dips and sprinkles – I’ve used everything from ramekins to teacups in a pinch. That’s seriously all you need to create this sweet masterpiece!
How to Assemble Your Valentine’s Day Charcuterie Dessert Board
Alright, let’s get to the fun part – assembling your masterpiece! I promise it’s easier than it looks, and I’ll walk you through each step just like I would if we were standing together in my kitchen. First, clear some counter space – you’ll want room to spread out and get creative. Here’s how I do it:
Start by placing your large serving board on a flat surface. I like to give mine a quick wipe with a damp cloth first – those stray crumbs from last time have a way of sneaking in! Next, grab those small bowls and place them strategically around the board. Think of them as anchor points – I usually put one near the top and another toward the bottom.
Now for the chocolates and sweets! Group them together in one section – I like to pile the chocolate-covered strawberries dramatically in one corner (they’re the stars, after all). Scatter the heart-shaped chocolates nearby, and don’t be afraid to let some spill over toward the center. Those mini marshmallows? Toss them in little clusters – they add such fun texture!
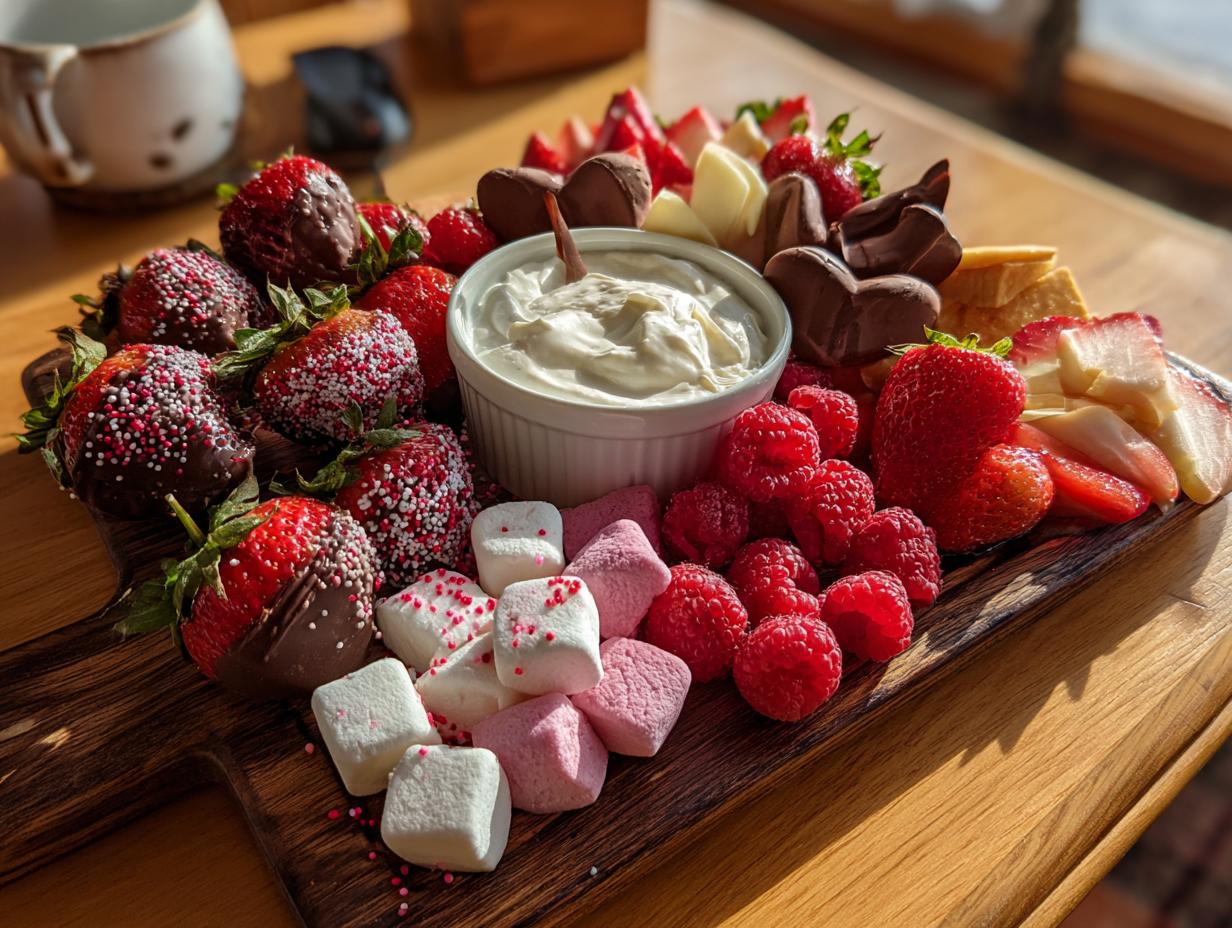
For the fruit section, arrange the raspberries and sliced strawberries in alternating patterns. I like to create a little « river » of red that flows across the board. Fill your bowls with the vanilla yogurt dip and sprinkles last – this keeps everything looking fresh. And voila! You’ve got yourself a showstopper. If you’re not serving immediately, just pop it in the fridge (covered lightly with plastic wrap) for up to 2 hours.
Tips for a Visually Stunning Board
Here’s my secret weapon for a board that’ll make everyone gasp: odd numbers. Group items in threes or fives – it just looks more natural. I also play with height – prop some strawberries upright, let others lie flat. And color? Oh honey, go wild with those reds and pinks! Cluster similar shades together for maximum impact.
Don’t forget negative space – your board needs breathing room to look elegant. My first attempt looked like a candy avalanche (delicious but messy). Now I leave little pathways between sections. And here’s a pro tip: add your sprinkles last, right before serving, so they stay crisp. Trust me, after years of Valentine’s boards, these little tricks make all the difference!
Variations for Your Valentine’s Day Charcuterie Dessert Board
Oh, the possibilities! Once you’ve mastered the basic Valentine’s Day charcuterie dessert board, it’s time to play. My favorite part? Getting creative with twists that make each board unique. Last year, I added heart-shaped sugar cookies decorated with pink icing – they were almost too pretty to eat (almost!). For a richer option, swap the vanilla yogurt for chocolate hazelnut spread warmed slightly – it turns into this dreamy, dippable heaven.
Here are some of my go-to variations:
- Themed cookies – heart shapes, XO letters, or even cute animal cookies with heart decorations
- Flavored dips – try mixing strawberry puree into the yogurt or add a dash of cinnamon to melted chocolate
- Nutty additions – candied pecans or chocolate-covered almonds add wonderful crunch
- Adult version – drizzle some liqueur over the fruit or serve with champagne for dipping (so fancy!)
The best part? There’s no wrong way to do this. I’ve even seen someone use conversation hearts as edible decorations scattered across the board. Whatever makes your heart happy – that’s the perfect variation!
Serving and Storing Your Valentine’s Day Charcuterie Dessert Board
Okay, let’s talk about the best ways to serve and store your gorgeous creation! First rule: don’t assemble too early. I learned this the hard way when my sprinkles turned into little pink puddles (sad trombone sound). For peak freshness, assemble your Valentine’s Day charcuterie dessert board no more than 2 hours before serving. If you need to prep ahead, keep everything separate in airtight containers in the fridge, then arrange at the last minute.
When it’s showtime, set your board out at room temperature – cold chocolate just isn’t as dreamy. But here’s my pro tip: if your kitchen’s warm, pop the board in the fridge for 10 minutes before guests arrive to prevent melting disasters. Leftovers? Gently cover with plastic wrap (I use toothpicks to create a tent so it doesn’t smush the goodies) and refrigerate for up to 2 days. The fruit might get a bit soft, but it’ll still taste amazing – if there’s any left!
Nutritional Information
Here’s the real talk about nutritional stuff – this Valentine’s Day charcuterie dessert board is all about celebration, not counting calories! The exact nutrition facts can vary a ton depending on your chocolate brands, fruit sizes, and how generous you are with those sprinkles (no judgment here – I go heavy!).
What I can tell you? The fresh fruit adds natural sweetness and vitamins, while the chocolate brings joy (which totally counts as nutrition in my book). Enjoy every delicious bite guilt-free – some things in life, like love and dessert boards, aren’t meant to be measured too precisely!
Frequently Asked Questions
Can I make my Valentine’s Day charcuterie dessert board ahead of time?
You bet! I actually prep most components the night before – just keep everything separate. Store sliced fruit in airtight containers with a squeeze of lemon juice to prevent browning. Chocolate-covered strawberries hold up great in the fridge overnight too. The key is assembling no more than 2 hours before serving so nothing gets soggy. Trust me, I learned this after my first attempt turned into a sprinkle soup situation!
How long will my dessert board last after assembling?
Real talk – it’s usually gone in minutes at my house! But if you somehow have leftovers (miracle worker!), cover gently with plastic wrap and refrigerate for up to 2 days. The fruit might soften a bit, but it’ll still taste delicious. Pro tip: remove any uneaten chocolate-covered items first – they’re best enjoyed fresh.
What if I can’t find heart-shaped chocolates?
Don’t stress! I’ve been there – Valentine’s Day sneaks up on me every year. Get creative with regular chocolate bars chopped into rough hearts (no one will notice the imperfect shapes once they taste them). Or use chocolate kisses, M&Ms, or even chocolate chips. The board will still look and taste amazing – promise!
Can I make this board for a crowd?
Absolutely! This is my go-to for Galentine’s parties. Just double or triple the ingredients and use multiple boards or a huge platter. I like creating mini individual boards sometimes too – so cute with tiny ramekins of dip. The beauty of this dessert charcuterie is how easily it scales up.
What’s the best way to transport a dessert board?
Oh honey, I’ve transported more boards than I can count! First, make sure everything’s secure – I use non-slip shelf liner under the board in my car. Cover loosely with plastic wrap (toothpick « tents » prevent smushing). Bring dips in separate containers to add at the last minute. And drive carefully – sudden stops and chocolate strawberries don’t mix well, as I learned the hard way!
Valentine’s Day Charcuterie Dessert Board
Ingrédients
Equipment
Method
- Arrange the large serving board on a flat surface.
- Place small bowls on the board for dips or sprinkles.
- Group chocolates and sweets in one section of the board.
- Arrange fruits in another section, keeping colors vibrant.
- Fill bowls with yogurt dip and sprinkles.
- Serve immediately or refrigerate until ready to enjoy.