Nothing says Easter quite like the smell of melted chocolate and the sound of little hands shaping these adorable Easter cereal nests! I still remember my niece’s face lighting up when she pressed those first candy eggs into her very own chocolate nest – messy fingers and all. That’s the magic of this recipe: it turns simple pantry staples into holiday memories. Whether you’re prepping for an egg hunt or just want a quick kitchen project, these edible nests are the perfect blend of easy, fun, and delicious.

Why You’ll Love These Easter Cereal Nests
Oh, where do I even start with why these little nests stole my heart? First off, they’re ridiculously easy – we’re talking 15 minutes from pantry to pretty presentation. No fancy skills needed, just melted chocolate and some eager little helpers. My nephew calls them « edible craft projects, » and honestly? That’s exactly what they are.
Here’s why they’ll become your Easter staple too:
- Speed demon special: When you’re juggling egg decorating and last-minute ham prep, a dessert that comes together in microwave bursts is a lifesaver.
- Kid magnet: Little hands can do everything from stirring (supervised!) to nest-shaping to the all-important egg placement. Messy fingers = happy memories.
- Endless personality: Swap cereals, mix chocolate colors, or use different egg candies – each batch becomes its own edible masterpiece.
- Party perfect: They look adorable on dessert tables, and no one will believe how simple they were to make (your secret!).
Last Easter, I brought these to three different gatherings, and guess what? Empty plates every time. That crispy-chocolatey bite with the sweet egg surprise? Pure holiday magic.
Ingredients for Easter Cereal Nests
You won’t believe how these magical little nests come together with just a few simple ingredients – most of which you probably have in your pantry right now! I love recipes like this where I don’t have to make a special grocery run. Here’s everything you’ll need, broken down between the nest base and the fun decorative touches.
For the Nests
- 3 cups chow mein noodles or shredded wheat cereal – Here’s where you can get creative! I’ve used both and love the texture each brings. The noodles give that classic « twiggy nest » look, while shredded wheat makes a cozier version my kids adore.
- 1 cup milk chocolate chips – I’m partial to the name-brand ones for smoother melting, but any decent quality chips will work wonders.
- 1 cup semisweet chocolate chips – This combo with the milk chocolate creates the perfect balance – not too sweet, not too bitter. Grandma’s secret touch!
- 1 tbsp vegetable oil – Just enough to make that chocolate nice and pourable without making the nests greasy.
For Decorating
- 36 mini candy eggs – About 3 per nest is the sweet spot (pun intended!). I grab whatever pastel-colored candies catch my eye – jelly beans, chocolate eggs, even those crunchy candy-coated ones all work beautifully.
See? I told you it was simple! The magic happens when these basic ingredients come together to create something way more special than the sum of its parts. Now let’s turn them into edible springtime art!
Equipment Needed for Easter Cereal Nests
Here’s the beautiful part – you barely need any special tools to make these adorable nests! When I first tried this recipe years ago, I was shocked that something so cute could come from such basic kitchen staples. Here’s all you’ll need:
- A standard muffin tin (mine’s that trusty old 12-cup pan I’ve had since college – no need for fancy shapes!)
- A microwave-safe bowl (I use my grandma’s vintage Pyrex – anything that won’t melt will do)
- Measuring cups (eyeballing the chocolate never works out well for me, trust experience!)
That’s literally it! Sometimes simple is best, especially when you’re baking with excited little helpers who can’t wait to dig in. No mixers, no fancy gadgets – just good old-fashioned hands-on fun.
How to Make Easter Cereal Nests
Okay, let’s get to the fun part – turning those simple ingredients into adorable edible nests! I’ve made these so many times that I could probably do it with my eyes closed (though I don’t recommend that with melted chocolate involved). The whole process takes about 15 minutes of active time, and watching the kids’ faces light up when they shape their first nest? Priceless. Here’s exactly how we do it:
Step 1: Prepare Your Workspace
First things first – line that muffin tin! I learned the hard way that skipping liners means chocolate cemented to the pan (oops!). Regular paper liners or parchment squares work great. Now, melt your chocolate chips with the oil in 30-second microwave bursts, stirring between each. Trust me, rushing this step leads to scorched chocolate disasters!
Step 2: Combine Ingredients
Once your chocolate’s smooth and glossy, gently fold in the cereal with a rubber spatula. This is where kids can help – just remind them to be gentle! You want every piece coated but not crushed. If the mixture starts clumping, add a teaspoon more oil. The ideal texture should hold together when pressed but still look loose.
Step 3: Shape and Decorate
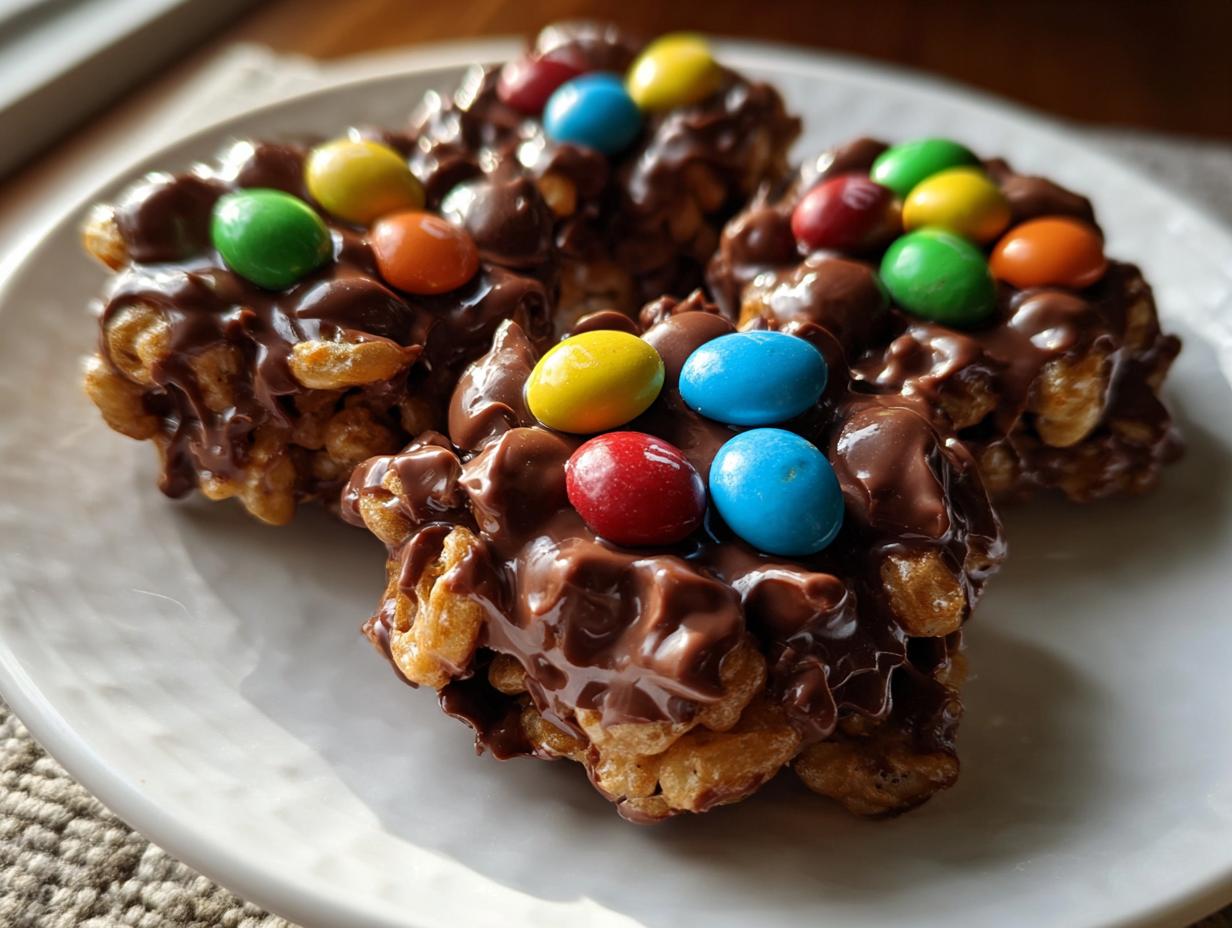
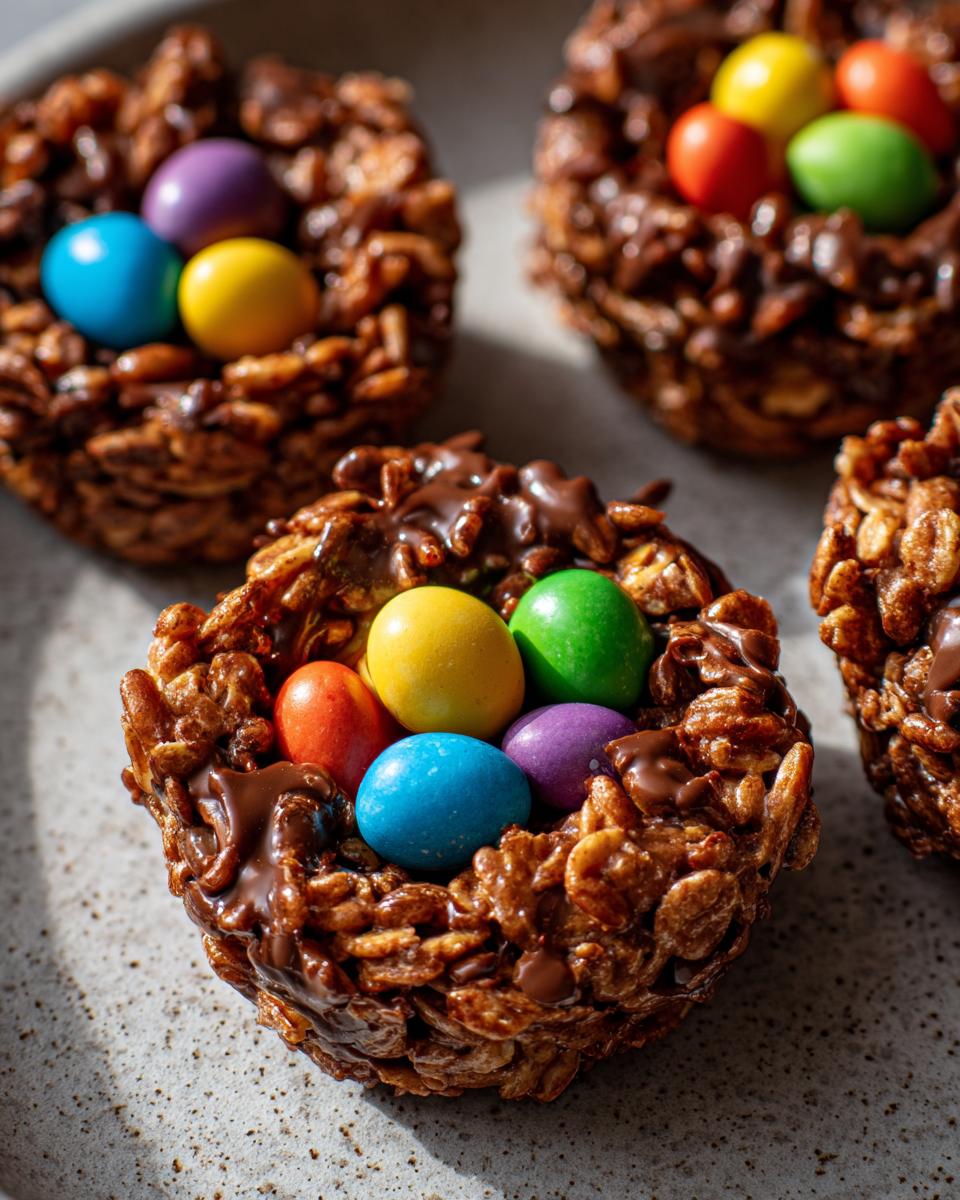
Now the magic happens! Spoon about 1/4 cup of mixture into each liner. Use the back of a teaspoon to press a well in the center – this makes the perfect little nest shape. Working quickly before the chocolate sets, let little fingers press in 3 candy eggs per nest at jaunty angles. They look especially cute when some eggs peek over the edge like they’re about to hatch!

Pop them in the fridge for about 30 minutes to set, then prepare for oohs and ahhs when you unveil your edible Easter masterpieces. Pro tip: the nests hold up better if you let them sit at room temp for 5 minutes before serving.
Tips for Perfect Easter Cereal Nests
After making dozens of these sweet little nests (and yes, a few messy failures!), I’ve learned a few tricks that guarantee picture-perfect results every time. First off – parchment liners are your best friend. The first year I used wax paper? Big mistake! The nests stuck terribly. Parchment peels away cleanly, showing off every adorable detail.
Here’s my golden rule: work fast once that chocolate is melted. It starts setting quicker than you’d think! I keep everything pre-measured and ready to go before melting. Pro tip? If your mixture starts hardening, a quick 5-second microwave zap brings it back to perfect nest-shaping consistency.
The most important tip? Let the kids take charge of decorating! Some of my favorite memories are my niece carefully arranging her « baby bird eggs » with totally uneven (but adorable) spacing. Their imperfect placements make each nest unique and full of personality. Just keep wet wipes handy – chocolate-covered little fingers are inevitable!
Variations for Easter Cereal Nests
Half the fun of these nests is making them your own! My niece swears by white chocolate nests with shredded coconut « grass » – so pretty on an Easter dessert table. My neighbor uses crispy rice cereal for a completely different texture that kids go crazy for.
Feeling adventurous? Try these easy swaps:
- Chocolate twist: Swap in dark or white chocolate chips (or do half-and-half!) for different flavor profiles
- Cereal fun: Cornflakes give a golden crunch, while bran flakes add a nutty note – let your pantry inspire you
- Vegan magic: Use dairy-free chocolate and swap honey-sweetened cereals for a plant-based version just as delicious
The best part? Every variation still holds those candy eggs perfectly – it’s like a new edible experiment each time!
Storage Instructions for Easter Cereal Nests
Now, here’s the beautiful thing about these little nests – they actually keep their charm for days! Just pop them in an airtight container (I use my trusty glass cookie jar) at room temperature, and they’ll stay crunchy and delightful for up to 3 days. No need to refrigerate unless your kitchen gets super warm.
Pro tip: If you’re stacking them, tuck pieces of parchment paper between layers so they don’t stick together. Those chocolate edges can be a little clingy! I learned this the hard way after my first batch turned into one big Easter nest cluster (still tasty though).
Nutritional Information
Okay, let’s be real – we’re not making these adorable Easter cereal nests for their health benefits! But for anyone curious (or just tracking), here’s the scoop. Keep in mind, these values are estimates – your actual nutrition may vary depending on exact ingredients.
Each nest clocks in at about 180 calories, with 10g of that delicious fat (hey, it’s holiday chocolate!) and 22g of carbs to fuel all that egg hunting. You’ll get small amounts of fiber and protein too – just enough to make you feel slightly less guilty about eating three in one sitting (no judgment – I’ve been there!).
Frequently Asked Questions
Can I use different cereals for these Easter nests?
Absolutely! I’ve tried everything from cornflakes to bran flakes to crispy rice cereal – they all work wonderfully. Just stick to crisp, dry cereals that will hold their shape. My kids love the version with shredded wheat because it looks like a cozy bird’s nest. The key is making sure whatever you use gets fully coated with that delicious chocolate!
How long do the nests take to set properly?
Patience is tough when they look this good, but trust me – 30 minutes in the fridge makes all the difference! If you’re in a rush (Easter morning chaos, anyone?), pop them in the freezer for about 15 minutes instead. You’ll know they’re ready when the chocolate loses its shine and the nests hold their shape when touched lightly.
Can I make Easter cereal nests ahead of time?
Oh, you clever bunny! Yes, these beauties actually keep wonderfully. Make them up to 2 days before Easter and store at room temp in an airtight container. Just wait to add the candy eggs until you’re ready to serve – they can get a bit sticky if left sitting too long. Pro tip: stash extra undecorated nests in the freezer for last-minute Easter emergencies!


Easter Cereal Nests
Ingrédients
Equipment
Method
- Line a muffin tin with paper liners.
- Melt the chocolate chips and vegetable oil in a microwave-safe bowl, stirring every 30 seconds until smooth.
- Gently fold in the cereal until fully coated with chocolate.
- Spoon the mixture into the prepared muffin tin, shaping each portion into a nest with a small well in the center.
- Place 3 candy eggs in the center of each nest.
- Refrigerate for 30 minutes or until set.