Oh my gosh, you have to try this Oreo dessert recipe—it’s the one that always disappears first at my family gatherings! I first made it for my niece’s birthday party when I needed something quick but impressive, and now it’s become our go-to treat. The best part? No oven required! Just layers of crunchy Oreo crust, dreamy cream cheese filling, and silky chocolate topping. These Oreo dessert recipes are foolproof, which is perfect because I’m usually juggling a million things while cooking. Trust me, even your pickiest eaters will beg for seconds.
Why You’ll Love These Oreo Dessert Recipes
Listen, I wasn’t kidding when I said this dessert disappears fast! Here’s why everyone (yes, everyone) falls in love with it:
- No oven, no problem: Seriously, even my baking-challenged cousin can make this. Just mix, chill, and boom—dessert magic.
- 15 minutes of active prep: Perfect for when those sudden « I need sugar NOW » cravings hit (we’ve all been there).
- That creamy-crunchy combo: The silky filling nestled in that Oreo crust? Pure texture heaven.
- Potluck superstar: I’ve brought this to every BBQ and book club since 2018—always first to vanish from the dessert table.
- Endless tweaks:</ результатов.
Ingredients for Oreo Dessert Recipes
Okay, let’s talk ingredients – and here’s my little secret: this Oreo dessert is magical because it only needs simple stuff you probably already have. I’ve made this last-minute so many times when surprise guests show up! Just remember: measure everything exactly as written the first time you make it (my husband learned this the hard way when he « eyeballed » the sugar). After that, feel free to get creative!
For the Crust
This crust is the foundation of your dessert – it’s what gives that perfect crunch contrasting with the creamy layers above:
- 24 Oreo cookies – yes, count them! You’ll want the classic ones for this base layer, but I’ll tell you about fun variations later
- 6 tbsp melted butter – use the real stuff, none of that margarine business. I usually zap mine for about 20 seconds – watch closely so it doesn’t splatter!
For the Filling
Oh man, this cream cheese layer is what makes people beg me for the recipe. Pro tip: pull these ingredients out about 30 minutes before starting:
- 8 oz cream cheese – softened is key! If you forget to take it out early, you can microwave at 10% power for about 15 seconds
- 1/4 cup granulated sugar – I know it seems like a small amount, but trust me, it’s perfect with the sweet Oreos
- 2 tbsp milk – I usually use whole milk, but any kind works in a pinch
- 12 oz whipped topping – thawed! Nothing worse than finding rock-hard Cool Whip when you’re ready to mix
For the Topping
The crowning glory! These ingredients take your dessert from good to « can I have the recipe? » status:
- 1 cup chocolate chips – semisweet is my go-to, but milk chocolate works too if you’ve got a sweet tooth
- 1/4 cup whipping cream – makes the ganache silky instead of clumpy. Don’t try to substitute milk!
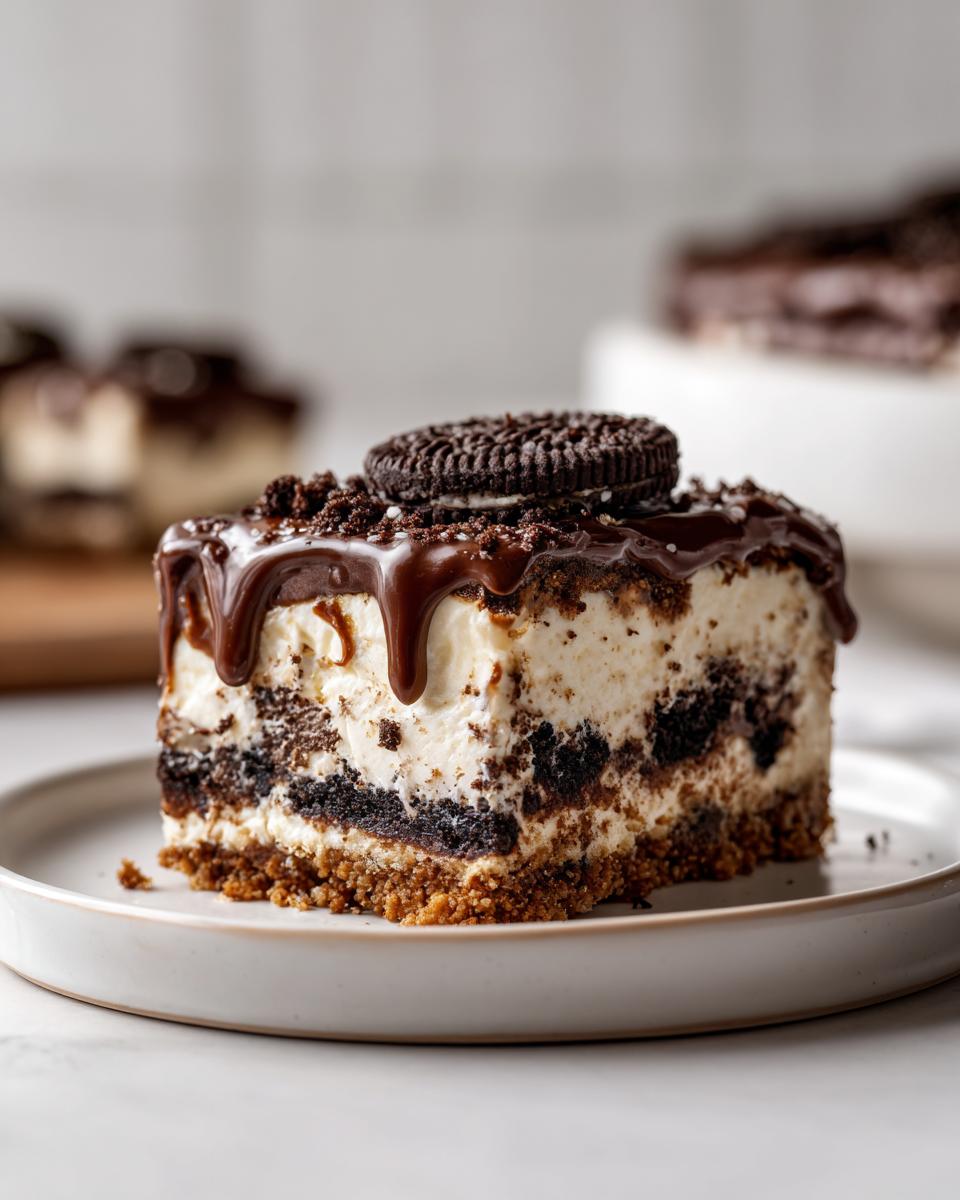
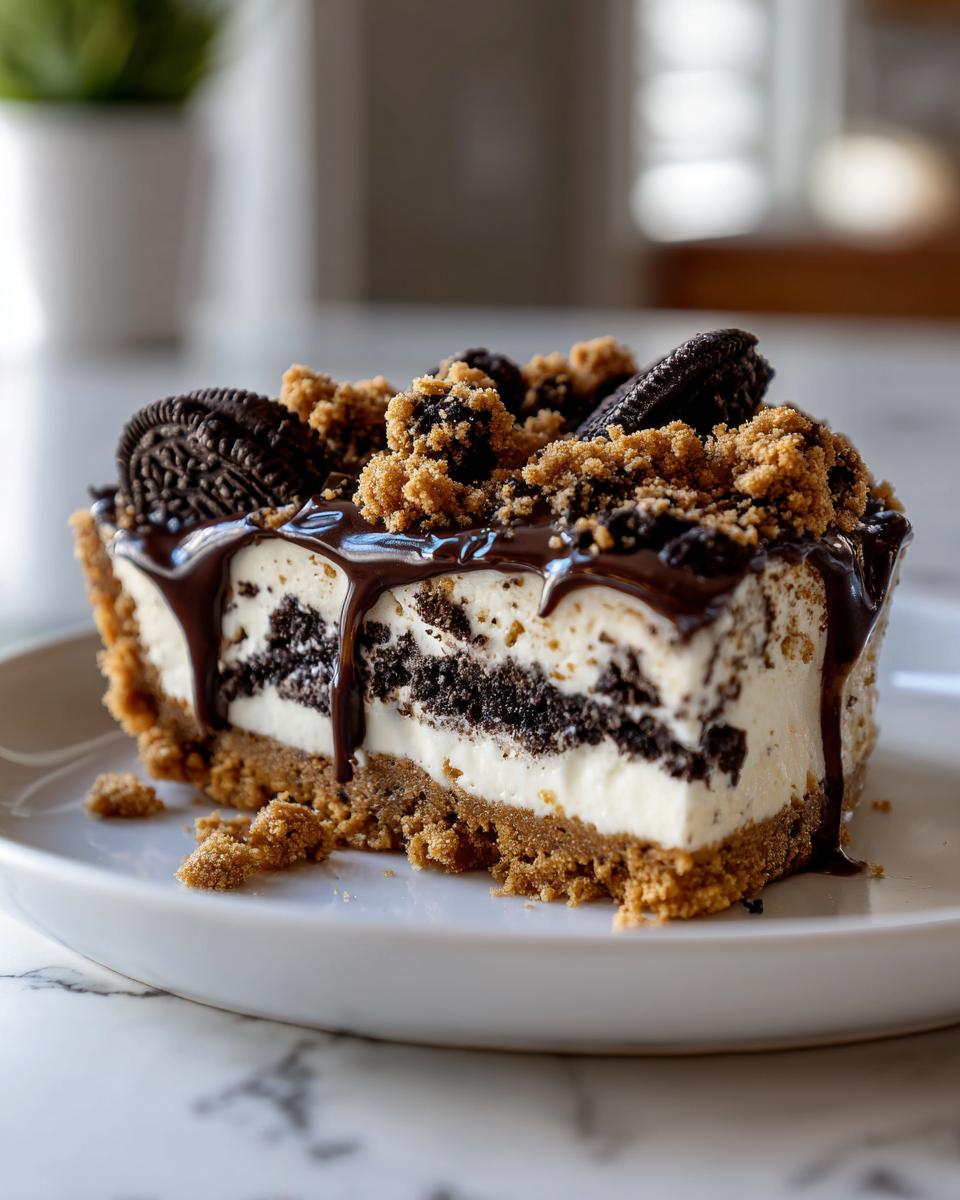
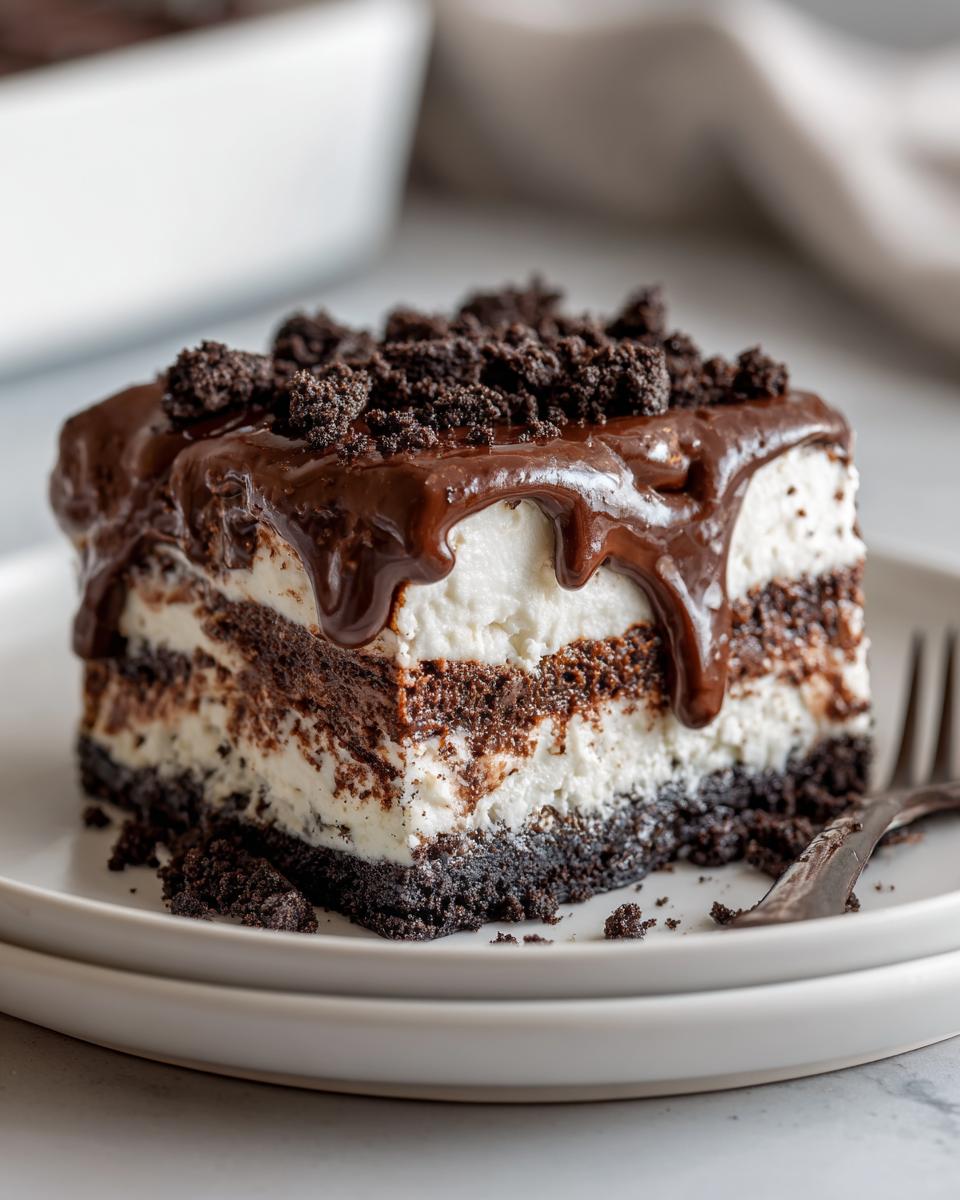
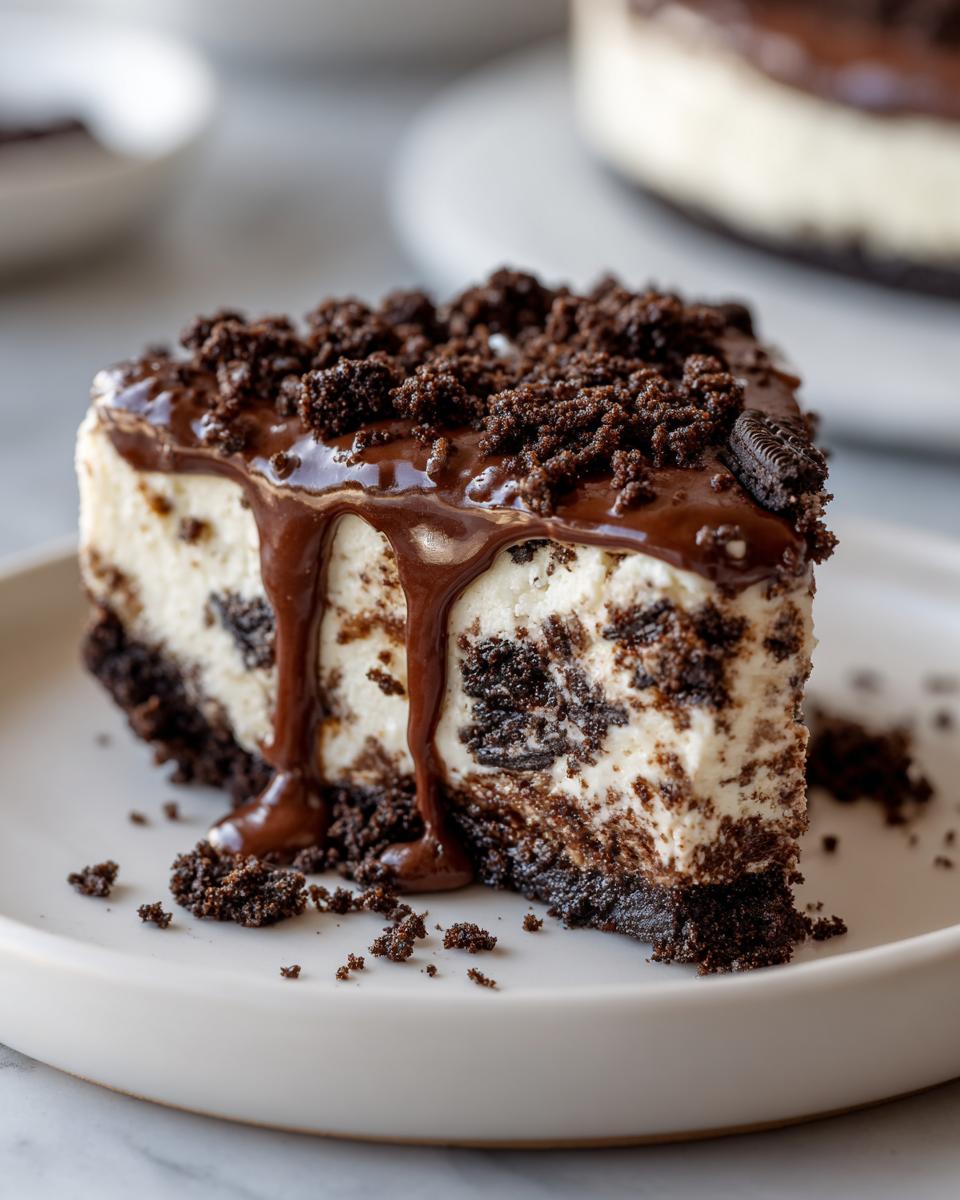
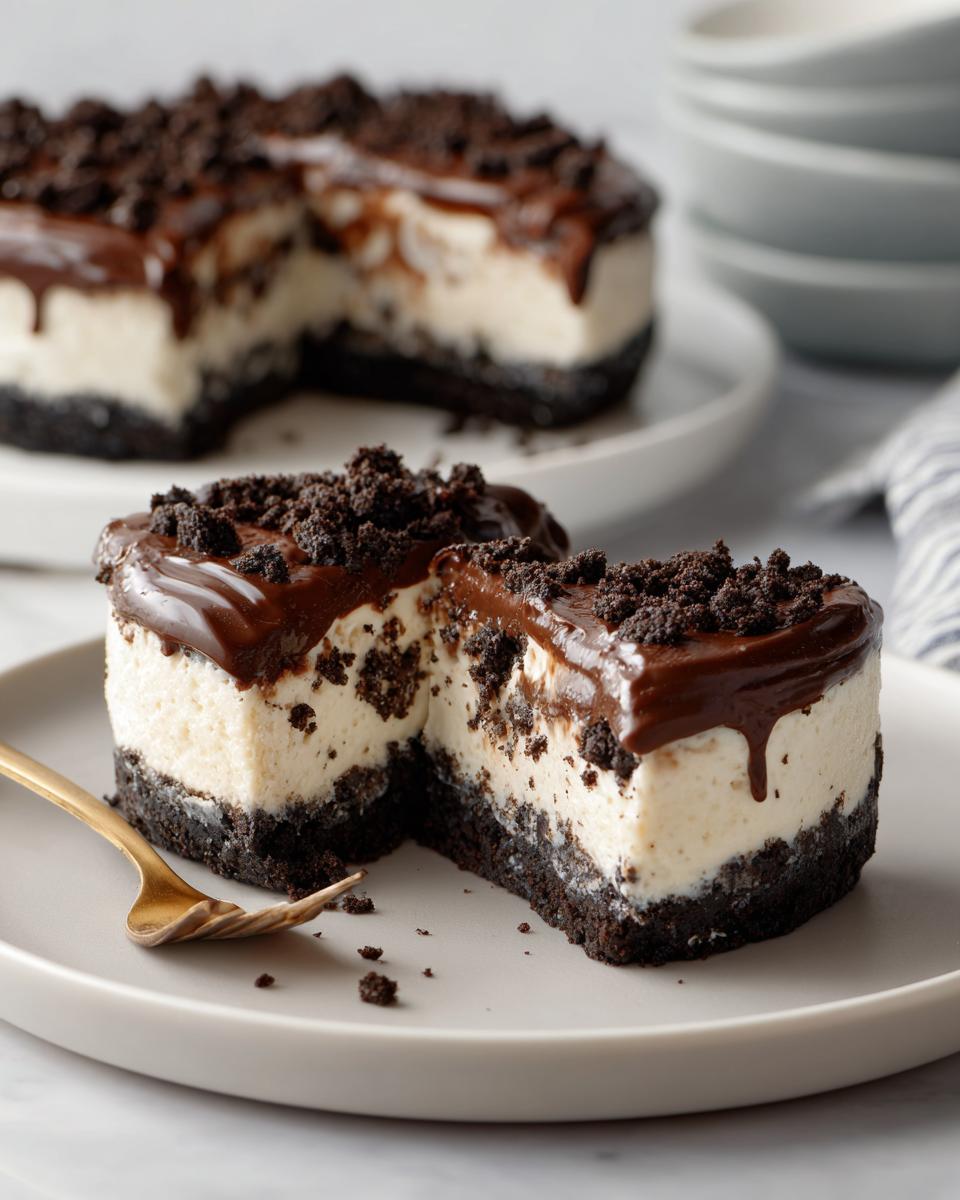
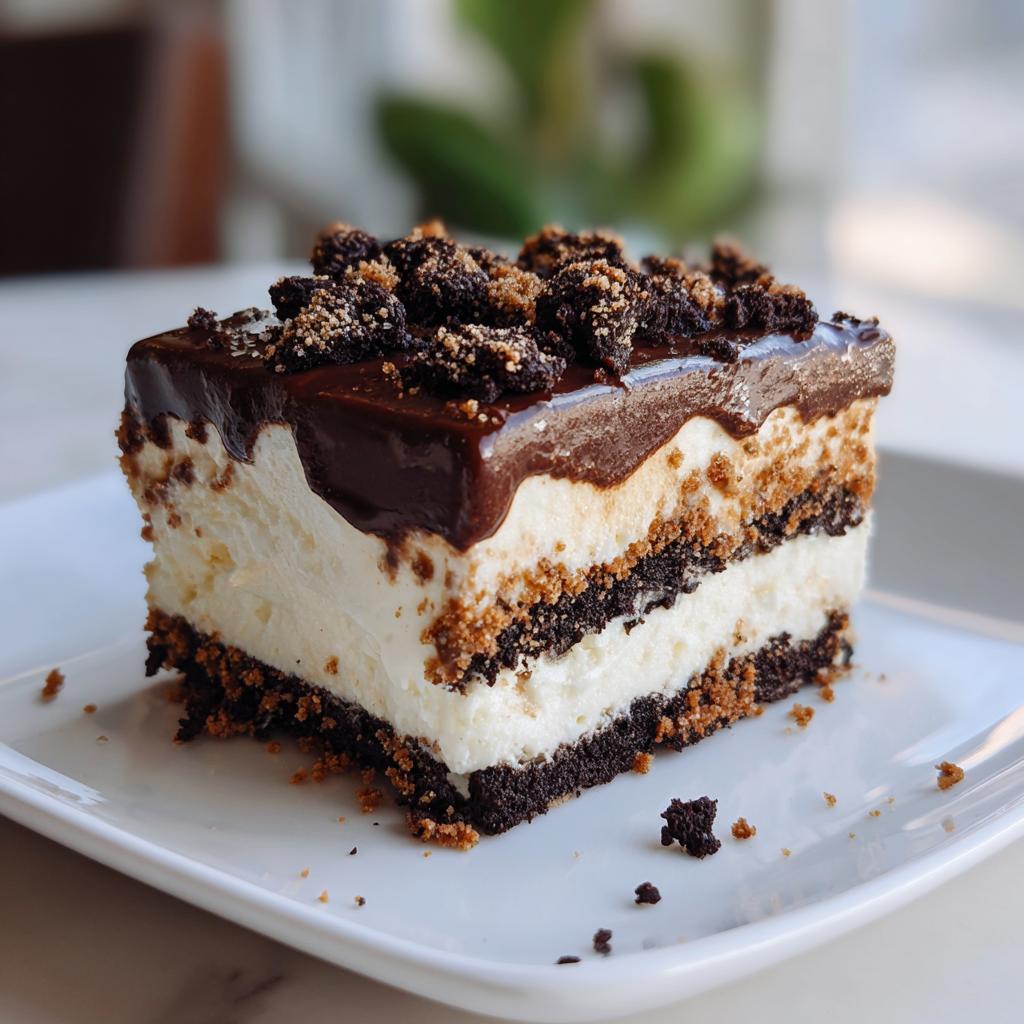
- The remaining 12 Oreo cookies – reserved from your original package. Crush these roughly – you want some big chunks for texture
Equipment Needed for Oreo Dessert Recipes
You won’t need fancy gadgets for this – just the basics from your kitchen! My go-tos are a trusty 9×13-inch baking dish (the one I stole from my mom and never returned), a food processor or ziplock bag if I’m feeling lazy, a couple mixing bowls, and my electric mixer. That’s it! See? No need to panic if you don’t have every kitchen gadget under the sun.
How to Make Oreo Dessert Recipes
Alright, let’s dive into the fun part—making this dreamy Oreo dessert! I promise it’s easier than it looks, and I’ll walk you through every step like we’re baking together in my kitchen. Just follow along, and you’ll have a showstopper dessert in no time. Don’t forget to lick the spoon—I won’t tell!
Prepare the Crust
First things first—the crust! Trust me, this is where the magic starts. Grab those 24 Oreos (the ones you didn’t sneak while measuring) and crush them into fine crumbs. I use my food processor for this because I’m lazy, but if you’re feeling nostalgic, toss them in a ziplock bag and go at them with a rolling pin—just don’t whack too hard or you’ll end up with Oreo confetti all over your kitchen (ask me how I know).
Mix those crumbs with the melted butter until they’re like wet sand—not too dry, not too soggy. Press this into your baking dish like you’re patting a baby’s back: firm but gentle. Pop this in the fridge to chill while you work on the filling—about 15 minutes should do it. This step is crucial, so no skipping! A firm crust means your layers won’t turn into a slumpy mess later.
Make the Cream Cheese Filling
Now, the star of the show—the filling! Beat that softened cream cheese and sugar together until it’s smoother than my grandkid’s excuses for eating dessert first. No lumps allowed! Add the milk and mix just until it’s silky. Then, gently fold in the whipped topping—think of it like folding laundry, but way more fun (and tastier). Don’t overmix, or the filling will lose its fluffiness. Spread this cloud of deliciousness over your chilled crust, then stick it back in the fridge. Seriously, don’t peek—let it set for at least 30 minutes before the next step.
Assemble the Layers
Time for the grand finale! Melt your chocolate chips and whipping cream together—I do this in the microwave in 30-second bursts, stirring in between. You want it glossy, not scorched. Let it cool just slightly (hot chocolate on cream cheese is a no-go), then pour it over your chilled filling. Use a spatula to spread it evenly—or go rogue and let it drizzle artistically. Finally, sprinkle those crushed Oreos on top like you’re sprinkling fairy dust. Now, the hardest part: walk away. Let this beauty chill for at least 4 hours (overnight is even better). I know it’s tempting, but trust me, the wait is worth it. When you finally cut into it, you’ll get those gorgeous layers that’ll make everyone at the table go « Wow! »
Tips for Perfect Oreo Dessert Recipes
Listen up, because these little tricks make ALL the difference in your Oreo dessert! First: your cream cheese MUST be room temp—I once tried to microwave it too long and ended up with cream cheese soup (total disaster). Chill time isn’t just a suggestion—that 4-hour wait lets the flavors cozy up together. And here’s my favorite hack: try mint Oreos for a refreshing twist, or peanut butter ones if you’re feeling wild. Last Christmas, I layered in some crushed candy canes—the kids went nuts! The beauty? You really can’t mess this up (unless you skip the chill time—don’t be that person).
Variations for Oreo Dessert Recipes
Oh, the fun part—playing with flavors! I love switching up this Oreo dessert to keep things exciting. Try mint Oreos for a cool, refreshing twist (perfect for summer BBQs), or peanut butter Oreos if you’re craving something nutty. Last time, I added a layer of sliced strawberries—total game changer! My cousin even swears by tossing in some mini chocolate chips between the layers. Honestly? The only limit is your imagination (and maybe how many Oreos you can resist eating straight from the package).
Nutritional Information for Oreo Dessert Recipes
Now, let’s keep it real—this is a treat, not kale salad! The nutritional info varies depending on brands and how generously you « sample » the ingredients while cooking (no judgment here). Remember, these sweet indulgences are meant to be enjoyed in moderation—but honestly, when that creamy Oreo goodness hits your tongue, all bets are off. Just promise me you’ll savor every blissful bite!
FAQs About Oreo Dessert Recipes
Alright, let’s tackle those burning questions I always get asked when I bring this Oreo dessert to parties. Trust me, after years of making this, I’ve heard them all!
Can I use different Oreo flavors in this recipe?
Absolutely! That’s the beauty of Oreo dessert recipes—they’re made for experimenting. I’ve had huge success with mint Oreos (hello, holiday version!) and peanut butter ones (my nephew’s favorite). Just stick with the same quantities. The golden Oreos give it a fun vanilla twist too. Honestly? The only wrong choice is not trying new flavors!
How long does this Oreo dessert keep in the fridge?
In my house? Never more than two days because we devour it! But realistically, it stays perfectly fresh for 3-4 days when covered. Pro tip: press plastic wrap directly on the surface to prevent drying. The crust might soften slightly by day 3, but I kinda love that melty texture.
Can I freeze Oreo dessert recipes like this?
You bet! Freeze it whole or in slices for up to a month. Just thaw overnight in the fridge—the texture stays remarkably creamy. I always stash an extra pan in my freezer for emergencies (like when my book club unexpectedly turns into a dessert party). The ganache might lose a tiny bit of shine, but nobody will notice once they taste it.
Help! My chocolate topping hardened too much—what gives?
Oh honey, I’ve been there! You probably needed a smidge more cream in your ganache. Next time, try a 1:1 ratio of chocolate to cream. For now? Serve it at room temp for 15 minutes—that usually softens it up beautifully. And remember, even « mess-ups » taste amazing when Oreos are involved!
Oreo Dessert
Ingrédients
Equipment
Method
- Crush 24 Oreo cookies into fine crumbs using a food processor or by placing them in a ziplock bag and crushing with a rolling pin.
- Mix the cookie crumbs with melted butter until well combined. Press the mixture firmly into the bottom of a 9×13-inch baking dish to form the crust. Chill in the refrigerator while preparing the filling.
- In a large bowl, beat the cream cheese and sugar until smooth. Add milk and mix well. Fold in the whipped topping until fully incorporated.
- Spread the cream cheese mixture evenly over the chilled crust. Return to the refrigerator.
- In a microwave-safe bowl, heat the chocolate chips and whipping cream in 30-second intervals, stirring between each, until melted and smooth. Let cool slightly.
- Pour the chocolate ganache over the cream cheese layer and spread evenly. Sprinkle crushed Oreo cookies on top.
- Chill in the refrigerator for at least 4 hours or until set before serving.