Oh my gosh, you have to try these hot dog mummies! They’re the absolute cutest Halloween party snack and so ridiculously easy to make. I first made them for my nephew’s spooky birthday bash last year, and let me tell you – the kids went wild for them! Even the adults couldn’t resist sneaking a few off the platter. The best part? You only need three simple ingredients and about 20 minutes to create these adorable wrapped hot dogs that look like little mummies. They’re perfect for Halloween parties, classroom treats, or just a fun family dinner that’ll have everyone giggling.
Why You’ll Love These Hot Dog Mummies
Trust me, these little guys are going to become your go-to Halloween treat! Here’s why:
- Super easy: Only 3 ingredients and 20 minutes start to finish – even my sleepy-eyed teenage nephew could make these
- Total crowd-pleaser: Kids adore the silly mummy faces, while adults secretly love the nostalgic hot dog flavor
- Perfect party food: Finger-food sized and oh-so-Instagrammable for your Halloween spread
- No baking skills needed: If you can wrap a bandage around a finger, you can make these (though my first attempt looked more like drunk zombies!)
- Customizable fun: Get creative with different mustards or ketchup for the eyes – spooky or googly, your choice!
Ingredients for Hot Dog Mummies
Okay, let’s gather up our three simple ingredients – that’s right, just three! I love recipes like this that don’t require a million things from the store. Here’s what you’ll need to make those adorable mummies come to life:
- 1 can refrigerated crescent roll dough – The magic wrapper! I’ve learned the hard way that the seamless dough sheets work better than perforated triangles.
- 8 hot dogs – Standard size works best. My secret? I sometimes use mini cocktail wieners for bite-sized mummies when the kids have friends over.
- Mustard – For the adorable little mummy eyes! Yellow mustard gives that classic look, but feel free to get creative with Dijon or even ketchup for different colored eyes.

See? Told you it was simple! Now let’s get wrapping and make some seriously cute mummies.
Equipment Needed for Hot Dog Mummies
You won’t need any fancy gadgets for these little mummies – just two basic kitchen essentials that you probably already have:
- Baking sheet – Any standard size will do. I use my trusty half-sheet pan that’s seen more Halloween treats than I can count!
- Parchment paper – This is my secret weapon to prevent any mummy-wrapping disasters. No stuck-on dough means your mummies will emerge from the oven looking perfectly preserved.
That’s it! Now let’s get these spooky snacks baking.
How to Make Hot Dog Mummies
Alright, let’s turn those basic ingredients into the cutest little mummies you’ve ever seen! I promise it’s easier than wrapping presents (and way more fun). Follow these simple steps, and you’ll have a plate full of spooky snacks in no time.
Step 1: Preheat and Prepare
First things first – crank that oven to 375°F (190°C). While it’s heating up, line your baking sheet with parchment paper. Trust me, this little step saves you from scrubbing stuck-on dough later!
Step 2: Prepare the Dough
Unroll your crescent dough on a clean surface – if you got the triangle kind, just press the seams together to make one big rectangle. Now grab a pizza cutter or knife and slice that dough into thin strips, about ¼ inch wide. Don’t stress about perfection – uneven strips actually make the mummies look more authentic!
Step 3: Wrap the Hot Dogs
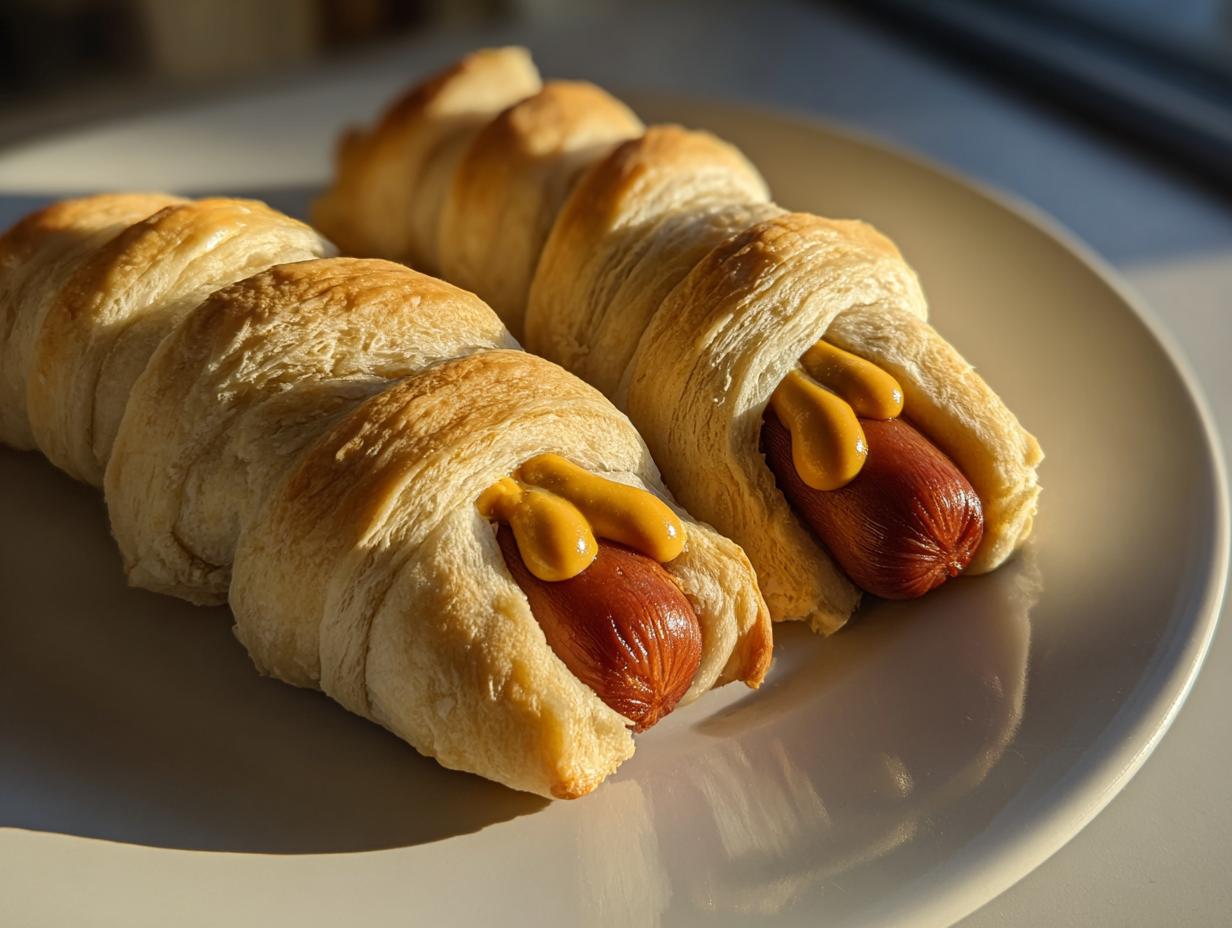
Here’s where the magic happens! Take a dough strip and start wrapping it around a hot dog in a mummy bandage pattern. Leave about an inch at the top uncovered for the eyes – this is crucial for that adorable mummy face. Pro tip: slightly overlap the strips as you go to create that classic wrapped look.
Step 4: Bake the Hot Dog Mummies
Arrange your wrapped mummies on the prepared baking sheet, giving them some space to breathe. Pop them in the oven for 10-12 minutes until they’re golden brown and puffed up. You’ll know they’re done when the dough looks crispy and the hot dogs start peeking through!

Step 5: Add the Eyes
Now for the cutest part! Let your mummies cool just enough so you don’t burn your fingers, then use a toothpick to dab on little mustard eyes. Feeling creative? Try ketchup for red eyes or mix mustard with mayo for ghostly white peepers. Watch out – they’ll be staring at you until you eat them!
Tips for Perfect Hot Dog Mummies
Trust me, I've made some truly cursed mummies over the years – here're my pro tips to save yours from winding up burned, goopy or with no eyes:
- Cut those dough strips thin – They'll bake more evenly (no one likes a raw mummy belly) and look more authentic like I learned the hard way.
- Leave space for eyes – It's tempting to wrap the whole hot dog but, oh boy, your poor mummies will look like they're wearing blindfolds if you do.
- Serve warm – Mummies are best when fresh, just like my family Sunday brunches – pop them in the oven right before serving.
- Use mustard dots – Stick them on with a toothpick for better precision than my first attempt went wel – those mummies looked like they had dottese eyes.
- Serve with dips – A side of ketchup, mustard or egg wting spread makes your mummies extra fun and tasty.
Serving Suggestions for Hot Dog Mummies
Oh, these little mummies deserve a proper Halloween showcase! I love arranging them on a dark platter with spooky garnishes – think black sesame « spider eggs » or parsley « graveyard moss. » They pair perfectly with other creepy snacks like monster eye cookies or witch finger pretzels.

For dips, I set out small bowls of « mummy blood » (ketchup), « witch’s potion » (spicy mustard), and « slime dip » (green-tinted ranch). Pro tip: label your dips with little tombstone signs for extra Halloween fun. Kids go nuts when I serve these at parties alongside eyeball punch in a cauldron!
FAQs About Hot Dog Mummies
I get so many questions about these adorable little mummies! Here are the answers to everything you might be wondering:
Can I use other types of dough?
Absolutely! While crescent dough works perfectly, I’ve had great success with puff pastry too – it gives a flakier « bandage » texture. Just roll it thinner before cutting into strips. Pizza dough works in a pinch, though it bakes up chewier (which my kids actually prefer!).
How do I store leftovers?
Honestly, they’re best fresh – but if you must save them, pop cooled mummies in an airtight container for up to 2 days. Reheat in a 350°F oven for 5 minutes to crisp them back up. The mustard eyes might run a bit, so I sometimes re-dot them after reheating.
Can I make these ahead of time?
You sure can! Wrap them up to 4 hours before baking and refrigerate until party time. The dough might puff a little less, but they’ll still taste delicious. I often prep a batch in the morning for evening parties – just add the eyes right before serving.
What if I don’t have mustard for the eyes?
Get creative! Ketchup makes great bloodshot eyes, mayo creates ghostly white peepers, and I’ve even used tiny bits of black olive for dramatic hollow sockets. For school parties, edible food markers work wonders for drawing on detailed faces.
Nutritional Information
Just a quick heads up – I don’t calculate exact nutritional info since ingredients vary so much by brand! But let’s be honest, we’re talking adorable Halloween treats here – they’re meant for fun, not fitting macros. That said, swapping turkey dogs could make these leaner mummies if you’re watching things.

Hot Dog Mummies
Ingrédients
Equipment
Method
- Preheat oven to 375°F (190°C). Line a baking sheet with parchment paper.
- Unroll the crescent dough and separate into triangles. Cut each triangle into thin strips.
- Wrap the dough strips around each hot dog, leaving a small space uncovered for the eyes.
- Place the wrapped hot dogs on the baking sheet. Bake for 10-12 minutes until golden brown.
- Use mustard to dot eyes on the uncovered part of each hot dog.